
D
Deleted member 923340
Guest
I was contacted recently to reverse engineer the Spotify app by a client. The client had already tried it with other developers and failed. Once my initial steps were done (explained below) - he didn't want to move forward.
Spent a few hours on this (for which I didn't get paid). I thought I'd share it here. This is not a complete tutorial. It's more like a push in the right direction for anyone interested in this stuff. I am sure there are better devs here who know better than me. Please free to add your inputs to this thread.
Install an emulator
We are going to use Genymotion for this.
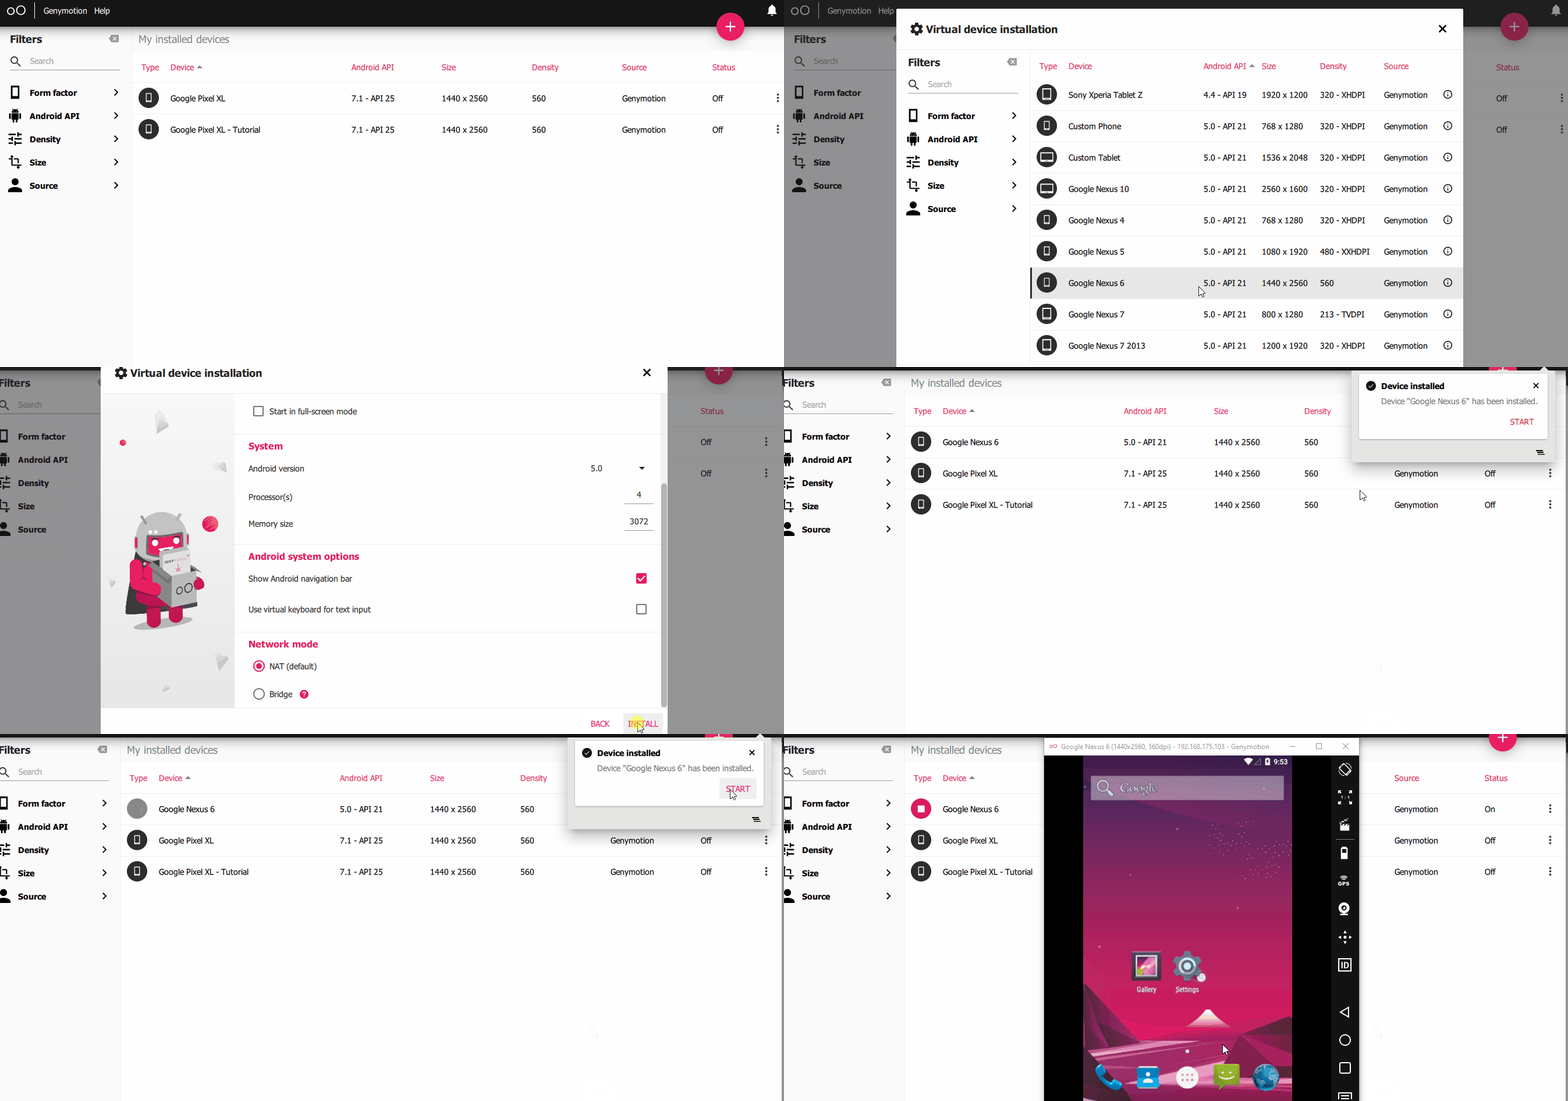
Run the virtual device and take note of the emulator IP

Make sure to enable debugging options on settings -> developer options

Download Platform Tools
Download platform-tools from the following link. We need this to talk with genymotion on several occasions.
https://developer.android.com/studio/releases/platform-tools
Unzip platform-tools. Open a PowerShell (or any terminal) and connect to your virtual device.

Installing apps on your virtual device
From Genymotion website
You need to patch your virtual device to install many apps including Spotify/Chrome etc. This is how you do it.

Now you can install apks on your device using the following command.
Install and setup burp to monitor network
Burp is a software you can set up to monitor network calls done via your browser, android apps etc.
Download and install the community edition: https://portswigger.net/burp/communitydownload
Once installed follow the step below and set up a proxy in your device.

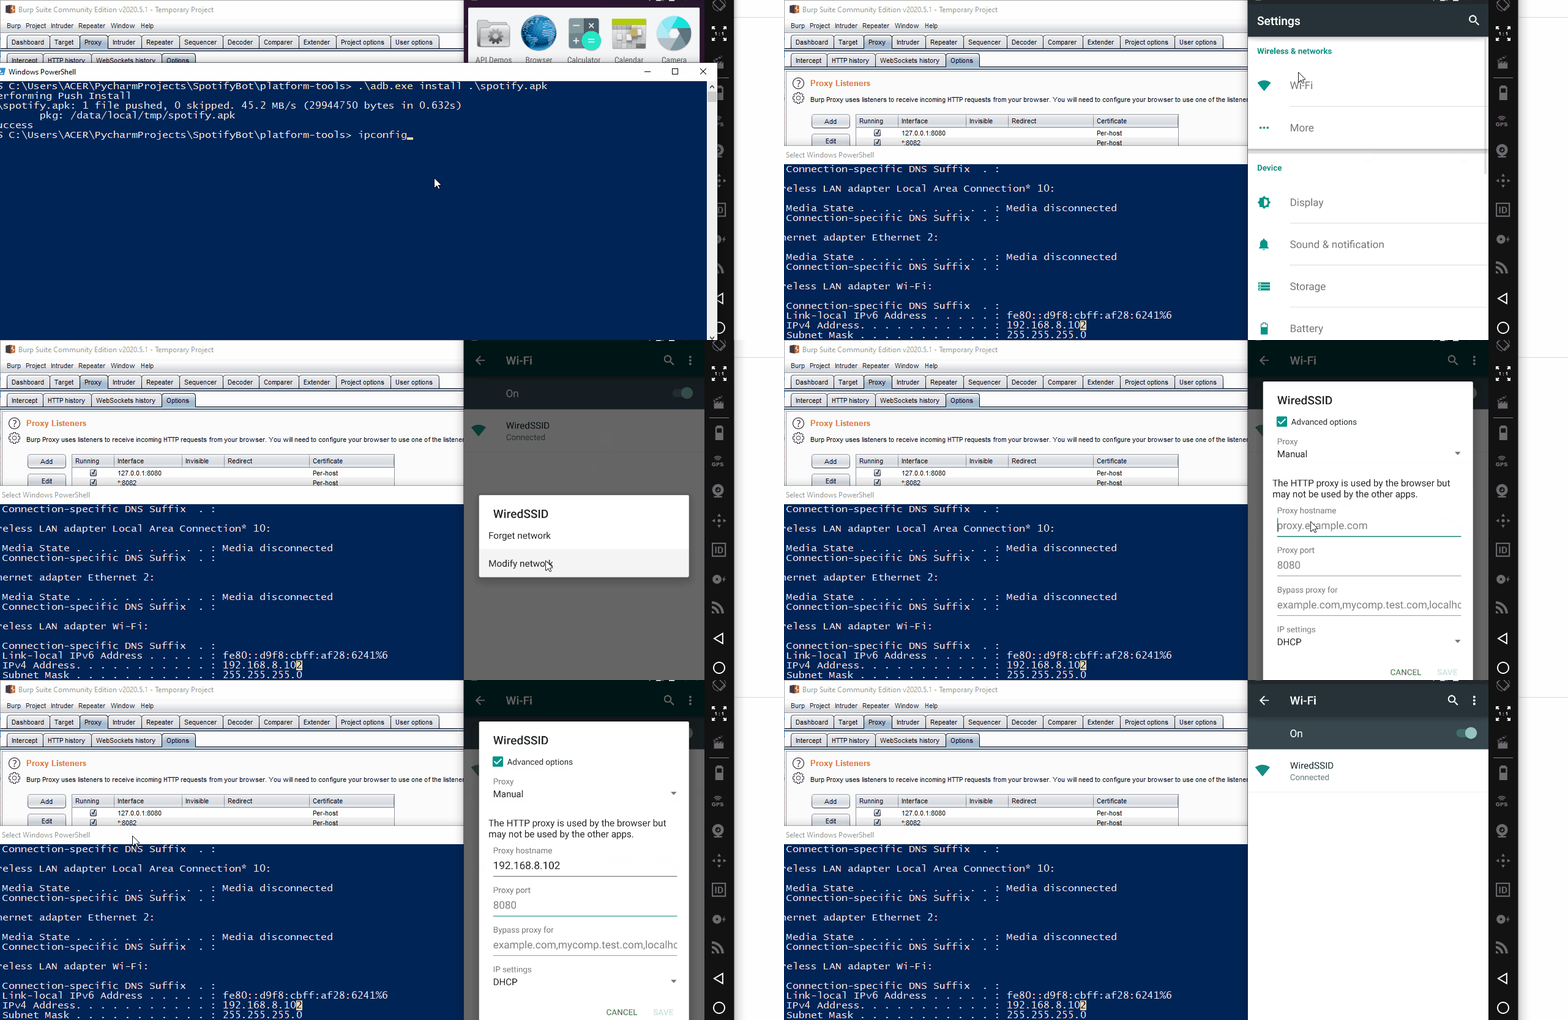
Now we can monitor all the HTTP data proxy going through your virtual device.
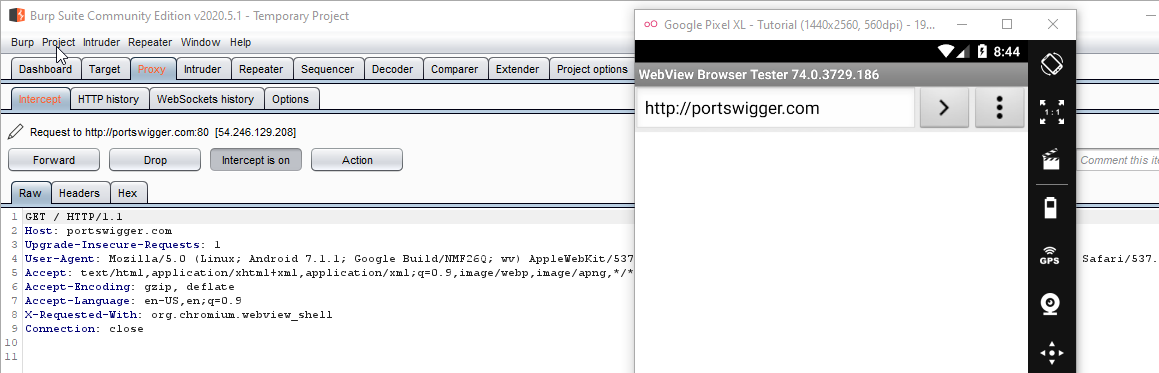
But If we try to visit an HTTPS site, we get the following warning:

Installing a self-signed certificate to monitor HTTPS traffic
For this to work. We need to install a certificate in our virtual device.
Save your certificate as cert.cer from Burp as following


Push that certificate to your virtual device using adb
Go to

Once the certificate is installed, you will be able to monitor https traffic without any problem.
If you used Nexus 6 (Android version 6) this is enough to view https data for most android apps.
Tumblr app login for example:

Once you have the data for these API calls, all you have to do Is write some python scripts using request library to automate account creation, following, etc. The sky is the limit.
But if you tried it against an app like Spotify/Twitter/Facebook etc. This is not possible. This is because of
SSL Pinning.
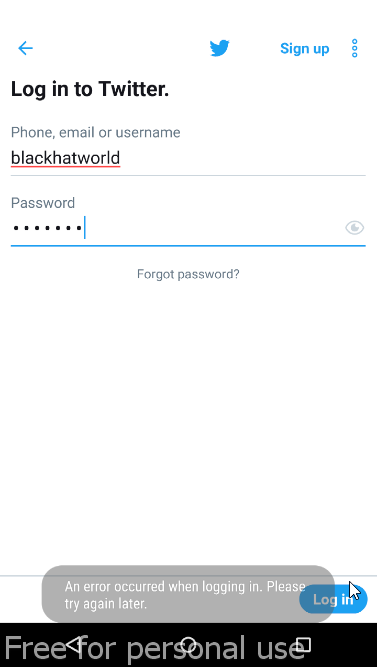
Basically when using SSL Pinning, just using a self-assigned certificate won't cut it. To bypass this, we need Frida.
Frida - SSL Pinning Bypass
Frida is a very powerful tool for reverse engineers. I'll only cover the steps to overcome this ssl-pinning issue. You should read more about it. If you wanna go on this path.


YAY YAY YAY That's it. We have successfully bypassed SSL Pinning. You should be able to view requests from twitter. (Or the app you were trying to bypass)

Notes:
The above script.js is taken from https://codeshare.frida.re/@pcipolloni/universal-android-ssl-pinning-bypass-with-frida/ and may not work for the app you are working with.
What you can do is decompile the app using https://github.com/skylot/jadx and look for "TrustManager", "Pinning" keywords.
Again, reverse engineering is a big topic. This thread is just a starting point for new developers to push them in the right direction.
Thank you for reading.

Spent a few hours on this (for which I didn't get paid). I thought I'd share it here. This is not a complete tutorial. It's more like a push in the right direction for anyone interested in this stuff. I am sure there are better devs here who know better than me. Please free to add your inputs to this thread.
Install an emulator
We are going to use Genymotion for this.
- Go to https://www.genymotion.com/download/ and install (with VirtualBox).
- Create an account here, you need the credentials to log into Genymotion (Personal use - gaming)
- Create a virtual device - I'd advise you to go with an android less than Android version 7.0
- I'm using both Nexus 6 (android 6.0) and Google Pixel XL (Android 7.1) for this example as I'm testing out some stuff - Reason
Run the virtual device and take note of the emulator IP
Make sure to enable debugging options on settings -> developer options
Download Platform Tools
Download platform-tools from the following link. We need this to talk with genymotion on several occasions.
https://developer.android.com/studio/releases/platform-tools
Unzip platform-tools. Open a PowerShell (or any terminal) and connect to your virtual device.
Code:
adb connect ip:5555Installing apps on your virtual device
From Genymotion website
Genymotion Desktop virtual devices architecture is x86 (32-bit). If your application uses ARMv7 code, you must install an ARM translation tool to make it work. The ARM translation tool must match your virtual device Android version.
You need to patch your virtual device to install many apps including Spotify/Chrome etc. This is how you do it.
- Go to https://github.com/m9rco/Genymotion_ARM_Translation/find/master and download the zip file that's matching to your android version. For this example it is Genymotion-ARM-Translation_for_6.0.zip
- Drag and drop the zip file on the virtual device and click ok.
- Reboot your virtual drive
adb reboot
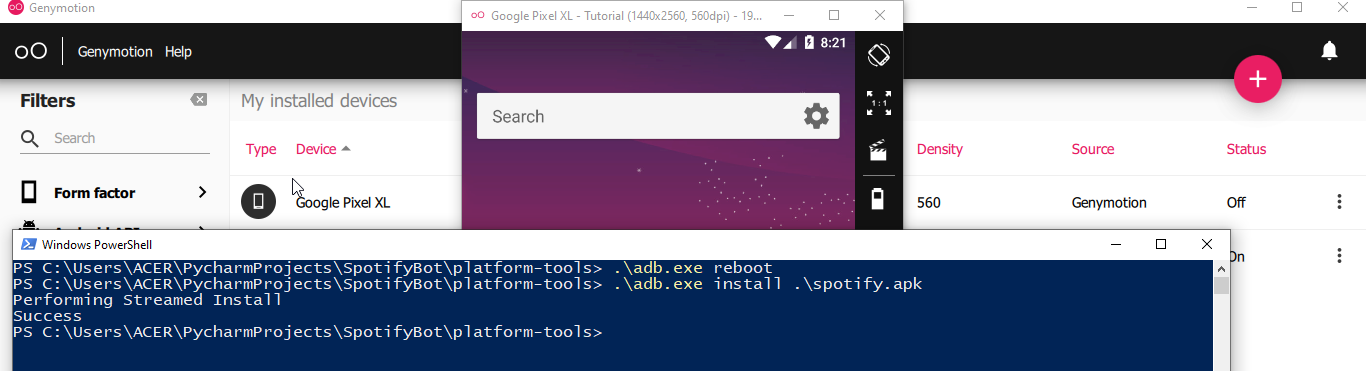
Now you can install apks on your device using the following command.
Code:
adb install <path-to-app.apk>Install and setup burp to monitor network
Burp is a software you can set up to monitor network calls done via your browser, android apps etc.
Download and install the community edition: https://portswigger.net/burp/communitydownload
Once installed follow the step below and set up a proxy in your device.
- Open blurp and create a temporary project.
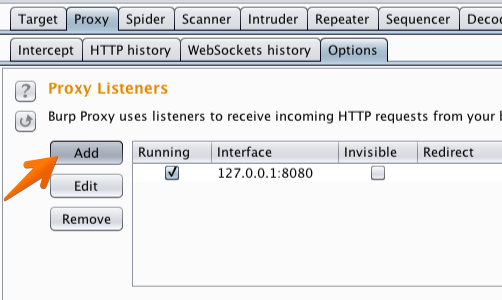
- Go to
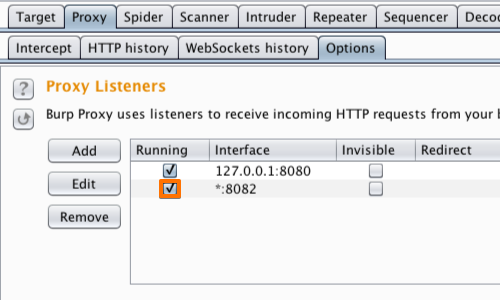
proxy -> options -> addand create a proxy to listen to all the interfaces - Make sure it is running (checkbox next to it)
- Go to Wifi settings on your virtual drive and set up the proxy. (Under advance options)
Now we can monitor all the HTTP data proxy going through your virtual device.
But If we try to visit an HTTPS site, we get the following warning:
Installing a self-signed certificate to monitor HTTPS traffic
For this to work. We need to install a certificate in our virtual device.
Save your certificate as cert.cer from Burp as following
Push that certificate to your virtual device using adb
adb push cert.cer /sdcard/Download/cert.cer
Go to
settings -> security -> Under credentials storage -> Install from SD card and select the .cer file you just uploaded. Sometime you will be asked to set a pin to your device.
Once the certificate is installed, you will be able to monitor https traffic without any problem.
If you used Nexus 6 (Android version 6) this is enough to view https data for most android apps.
Tumblr app login for example:
Once you have the data for these API calls, all you have to do Is write some python scripts using request library to automate account creation, following, etc. The sky is the limit.
But if you tried it against an app like Spotify/Twitter/Facebook etc. This is not possible. This is because of
SSL Pinning.
SSL Pinning is a technique that we use in the client side to avoid man-in-the-middle attack by validating the server certificates again even after SSL handshaking
Basically when using SSL Pinning, just using a self-assigned certificate won't cut it. To bypass this, we need Frida.
Frida - SSL Pinning Bypass
Frida is a very powerful tool for reverse engineers. I'll only cover the steps to overcome this ssl-pinning issue. You should read more about it. If you wanna go on this path.
- Install python from - https://www.python.org/downloads/ and make sure
pythonandpipcommands are in your path. - Open a terminal and install required tools
Code:
pip install Frida
pip install objection
pip install frida-tools- Save the following code in your plateform-tools directory as frida-inject.js
JavaScript:
/*
   Android SSL Re-pinning frida script v0.2 030417-pier

   $ adb push burpca-cert-der.crt /data/local/tmp/cert-der.crt
   $ frida -U -f it.app.mobile -l frida-android-repinning.js --no-pause

   https://techblog.mediaservice.net/2017/07/universal-android-ssl-pinning-bypass-with-frida/

   UPDATE 20191605: Fixed undeclared var. Thanks to @oleavr and @ehsanpc9999 !
*/

setTimeout(function(){
    Java.perform(function (){
        console.log("");
        console.log("[.] Cert Pinning Bypass/Re-Pinning");

        var CertificateFactory = Java.use("java.security.cert.CertificateFactory");
        var FileInputStream = Java.use("java.io.FileInputStream");
        var BufferedInputStream = Java.use("java.io.BufferedInputStream");
        var X509Certificate = Java.use("java.security.cert.X509Certificate");
        var KeyStore = Java.use("java.security.KeyStore");
        var TrustManagerFactory = Java.use("javax.net.ssl.TrustManagerFactory");
        var SSLContext = Java.use("javax.net.ssl.SSLContext");

        // Load CAs from an InputStream
        console.log("[+] Loading our CA...")
        var cf = CertificateFactory.getInstance("X.509");

        try {
            var fileInputStream = FileInputStream.$new("/data/local/tmp/cert-der.crt");
        }
        catch(err) {
            console.log("[o] " + err);
        }

        var bufferedInputStream = BufferedInputStream.$new(fileInputStream);
          var ca = cf.generateCertificate(bufferedInputStream);
        bufferedInputStream.close();

        var certInfo = Java.cast(ca, X509Certificate);
        console.log("[o] Our CA Info: " + certInfo.getSubjectDN());

        // Create a KeyStore containing our trusted CAs
        console.log("[+] Creating a KeyStore for our CA...");
        var keyStoreType = KeyStore.getDefaultType();
        var keyStore = KeyStore.getInstance(keyStoreType);
        keyStore.load(null, null);
        keyStore.setCertificateEntry("ca", ca);

        // Create a TrustManager that trusts the CAs in our KeyStore
        console.log("[+] Creating a TrustManager that trusts the CA in our KeyStore...");
        var tmfAlgorithm = TrustManagerFactory.getDefaultAlgorithm();
        var tmf = TrustManagerFactory.getInstance(tmfAlgorithm);
        tmf.init(keyStore);
        console.log("[+] Our TrustManager is ready...");

        console.log("[+] Hijacking SSLContext methods now...")
        console.log("[-] Waiting for the app to invoke SSLContext.init()...")

           SSLContext.init.overload("[Ljavax.net.ssl.KeyManager;", "[Ljavax.net.ssl.TrustManager;", "java.security.SecureRandom").implementation = function(a,b,c) {
               console.log("[o] App invoked javax.net.ssl.SSLContext.init...");
               SSLContext.init.overload("[Ljavax.net.ssl.KeyManager;", "[Ljavax.net.ssl.TrustManager;", "java.security.SecureRandom").call(this, a, tmf.getTrustManagers(), c);
               console.log("[+] SSLContext initialized with our custom TrustManager!");
           }
    });
},0);- Download the Frida server from https://github.com/frida/frida/releases/, if you followed my steps you have to download the file ending with android-x86.xz (frida-server-version-android-x86.xz )
- Move the file to the platform-tools directory and rename it to
frida-server - Push the file to
/data/local/tmpusingadb pushcommand
Code:
./adb.exe push frida-server /data/local/tmp- Give permission to it using
Code:
./adb.exe shell chmod 777 /data/local/tmp/frida-server- Push the certificate we used previously with the name
cert-der.crt
Code:
./adb.exe push cert.cer /data/local/tmp/cert-der.crt- Push frida.js file we created using the following command
Code:
.\adb.exe push .\frida.js /data/local/tmp- Run the frida-server
Code:
./adb.exe shell /data/local/tmp/frida-server &- Run the following command in a new terminal (keep Frida server running) and copy the package name you are trying to bypass ssl-pinning
Code:
frida-ps -U- Hook the frida-inject.js file to the target application using the following command.
Code:
frida -U -f com.twitter.android -l frida-inject.js --no-pausYAY YAY YAY That's it. We have successfully bypassed SSL Pinning. You should be able to view requests from twitter. (Or the app you were trying to bypass)
Notes:
The above script.js is taken from https://codeshare.frida.re/@pcipolloni/universal-android-ssl-pinning-bypass-with-frida/ and may not work for the app you are working with.
What you can do is decompile the app using https://github.com/skylot/jadx and look for "TrustManager", "Pinning" keywords.
Again, reverse engineering is a big topic. This thread is just a starting point for new developers to push them in the right direction.
Thank you for reading.


