

scnonah
Regular Member
- Jan 2, 2017
- 229
- 138
Mods: Please move this thread if needed, there were a few places I though about placing it, but I figured this is where it would reach the most people.
This is my first attempt at helping the awesome community here at BHW. Iv'e learned so much, I figured I better start trying to pay it back. Hope it helps.
In this guide I wont discuss every single thing needed, but I really tried to make this detailed enough for someone who doesn't know a lot about SSL or hosting. I have tested this technique on Namecheap cPanel and GoDaddy cPanel and it works fine.
This technique uses an in browser solution, it's nowhere near the most efficient way of adding ssl, but its free. If you have a lot of sites, you'll probably want to automate this with a script on your server.
Step 1: Go to ZeroSSL.com.

Step 2: Click start under "Free SSL Certificate Wizard"

Step 3: Enter your email, domains and check the "Accept ZeroSSL TOS" and "Accept Let's Encrypt SA" boxes and click next. It you didnt enter it, it will ask you if you want to include the prefixed or non prefixed versions. I just say yes. It will generate your CSR (Cirtifircate Signing Request)

Step 4: Click Download. and then Click Next again. It will generate your account key.

Step 5: Click download again. And click next.
Step 6: Now, this step is a little more difficult. Go to your cPanel and open file manager. In the root of your site (usually home/username/public_html/), you need to create a new folder. Name it ".well-known". It must be spelled exactly like that with the period in front.

Step 7: Inside that ".well-known" folder, create another folder called "acme-challenge".

Step 8: After created those folders, you'll need to create the files it tells you to. If your doing both www and non www, you'll need to create two files. The file's need to be named as the text under "File" states, with NO file extension.
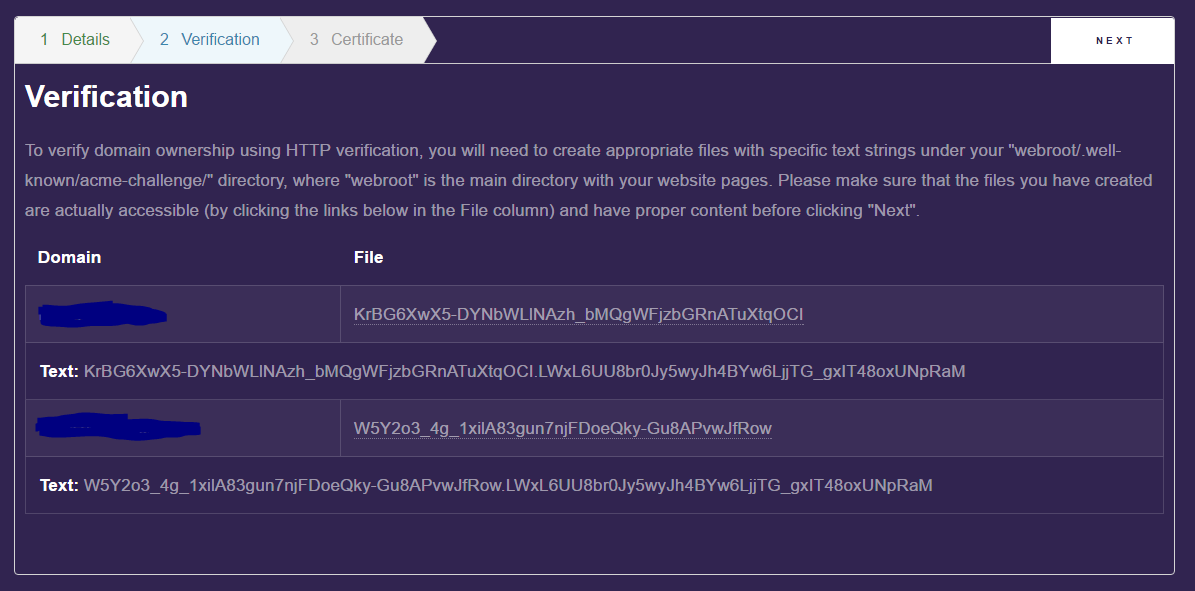

Step 9: Once the files are created, you'll need to paste the "text" inside of them. Right click the file and select edit, then paste the text.

Step 10: To make sure you did it right, click on the file name on zerossl.com. It should open a page to your site and show the text you pasted in the files. Test each one.

Step 11: Click Next. If all goes well, you should see this screen.

Step 12: Scroll down and download your Domain Certificate and Private Key.

Step 13: Go back to your cPanel. And go to your SSL section.

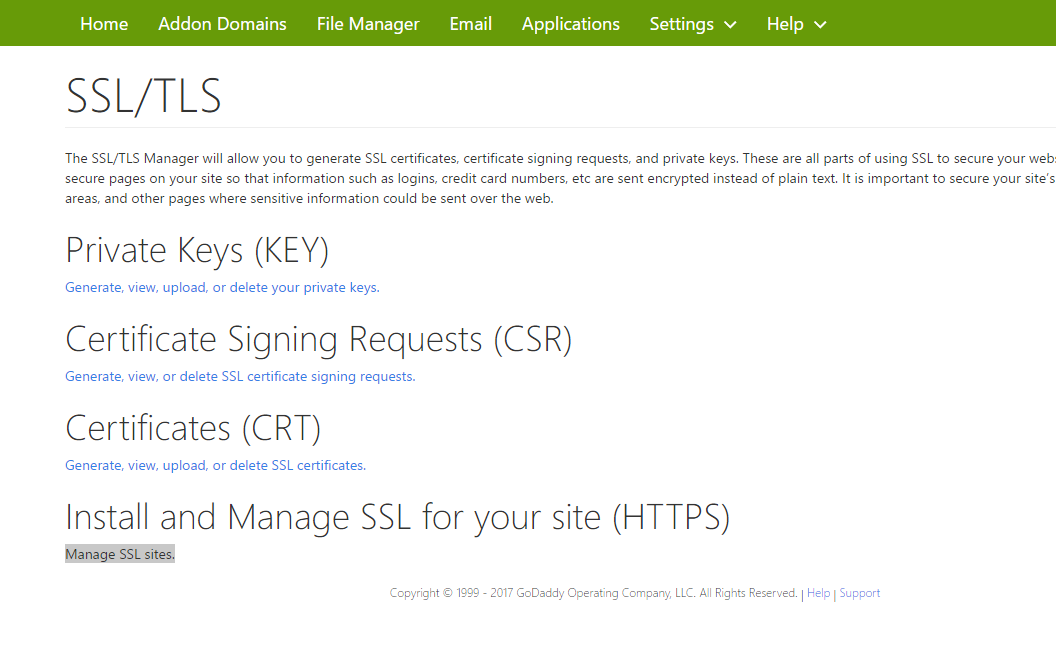
Step 14: You should see this. Click on the "Generate, view, upload, or delete SSL certificates.".

Step 15: Upload or paste the text from the "domain-cert.txt" file you downloaded on the last page of zerossl.com. Click save certificate.

Step 16: If it saved properly you should see this.

Step 17: Go back out to the SSL Section and click on "Manage SSL sites." under Install and Manage SSL for your site (HTTPS).
Step 18: Click on "Browse Certificates". You should see something like this. Click "Use Certificate".
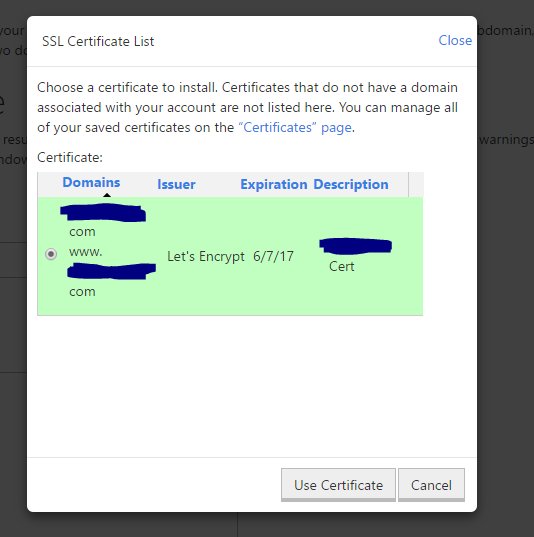
Step 19: Then make sure the correct domain is selected.

Step 20: Paste the text from the domain-key.txt file you downloaded on the last page of zerossl.com into the Private Key field.

Step 21: Click "Install Certificate" and you should see this.
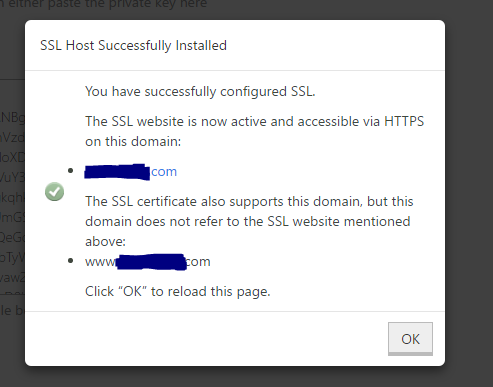
Step 22: FINISHED! You should now be able to navigate to the https:// version of your site. And you're done adding SSL.
Hope it helps someone, anyone!!!
Tip: If you want to force your site to only allow https, which you should do. You can use an htaccess file. It will automatically redirect someone heading to the http version to the https version. See below.
Important:If you have existing code in your .htaccess, add this above where there are already rules with a similar starting prefix.
Be sure to replace www.example.com with your actual domain name.
To force a specific domain to use HTTPS, use the following lines of code in the .htaccess file in your website's root folder:
Make sure to replace example\.com with the domain name you're trying force to https. Additionally, you need to replace www.example.com with your actual domain name.
If you want to force SSL on a specific folder you can insert the code below into a .htaccess file placed in that specific folder:
Make sure you change the folder reference to the actual folder name. Then be sure to replace www.example.com/folder with your actual domain name and folder you want to force the SSL on.
This is my first attempt at helping the awesome community here at BHW. Iv'e learned so much, I figured I better start trying to pay it back. Hope it helps.
In this guide I wont discuss every single thing needed, but I really tried to make this detailed enough for someone who doesn't know a lot about SSL or hosting. I have tested this technique on Namecheap cPanel and GoDaddy cPanel and it works fine.
This technique uses an in browser solution, it's nowhere near the most efficient way of adding ssl, but its free. If you have a lot of sites, you'll probably want to automate this with a script on your server.
Step 1: Go to ZeroSSL.com.
Step 2: Click start under "Free SSL Certificate Wizard"
Step 3: Enter your email, domains and check the "Accept ZeroSSL TOS" and "Accept Let's Encrypt SA" boxes and click next. It you didnt enter it, it will ask you if you want to include the prefixed or non prefixed versions. I just say yes. It will generate your CSR (Cirtifircate Signing Request)
Step 4: Click Download. and then Click Next again. It will generate your account key.
Step 5: Click download again. And click next.
Step 6: Now, this step is a little more difficult. Go to your cPanel and open file manager. In the root of your site (usually home/username/public_html/), you need to create a new folder. Name it ".well-known". It must be spelled exactly like that with the period in front.
Step 7: Inside that ".well-known" folder, create another folder called "acme-challenge".
Step 8: After created those folders, you'll need to create the files it tells you to. If your doing both www and non www, you'll need to create two files. The file's need to be named as the text under "File" states, with NO file extension.
Step 9: Once the files are created, you'll need to paste the "text" inside of them. Right click the file and select edit, then paste the text.
Step 10: To make sure you did it right, click on the file name on zerossl.com. It should open a page to your site and show the text you pasted in the files. Test each one.
Step 11: Click Next. If all goes well, you should see this screen.
Step 12: Scroll down and download your Domain Certificate and Private Key.
Step 13: Go back to your cPanel. And go to your SSL section.
Step 14: You should see this. Click on the "Generate, view, upload, or delete SSL certificates.".
Step 15: Upload or paste the text from the "domain-cert.txt" file you downloaded on the last page of zerossl.com. Click save certificate.
Step 16: If it saved properly you should see this.
Step 17: Go back out to the SSL Section and click on "Manage SSL sites." under Install and Manage SSL for your site (HTTPS).
Step 18: Click on "Browse Certificates". You should see something like this. Click "Use Certificate".
Step 19: Then make sure the correct domain is selected.
Step 20: Paste the text from the domain-key.txt file you downloaded on the last page of zerossl.com into the Private Key field.
Step 21: Click "Install Certificate" and you should see this.
Step 22:
FINISHED! You should now be able to navigate to the https:// version of your site. And you're done adding SSL.Hope it helps someone, anyone!!!
Tip: If you want to force your site to only allow https, which you should do. You can use an htaccess file. It will automatically redirect someone heading to the http version to the https version. See below.
Important:If you have existing code in your .htaccess, add this above where there are already rules with a similar starting prefix.
Code:
RewriteEngine On
RewriteCond %{SERVER_PORT} 80
RewriteRule ^(.*)$ https://www.example.com/$1 [R,L]To force a specific domain to use HTTPS, use the following lines of code in the .htaccess file in your website's root folder:
Code:
RewriteEngine On
RewriteCond %{HTTP_HOST} ^example\.com [NC]
RewriteCond %{SERVER_PORT} 80
RewriteRule ^(.*)$ https://www.example.com/$1 [R,L]If you want to force SSL on a specific folder you can insert the code below into a .htaccess file placed in that specific folder:
Code:
RewriteEngine On
RewriteCond %{SERVER_PORT} 80
RewriteCond %{REQUEST_URI} folder
RewriteRule ^(.*)$ https://www.example.com/folder/$1 [R,L]
Last edited:


