

thegoldeneye
Power Member
- Oct 26, 2015
- 544
- 520
@Festinger recommended this tutorial to me, so let's just get into it.
WHAT'S RANK MATH?
According to the Rank Math:
"Rank Math is a Search Engine Optimization plugin for WordPress that makes it easy for anyone to optimize their content with built-in suggestions based on widely-accepted best practices. Easily customize important SEO settings, control which pages are indexable, and how you want your website to appear in search with Structured data."
In my view:
As they said, it's an SEO plugin for WP the same as the Yoast, but they have many more free features, and in the Yoast, they are premium.
Here's the comparison table, and you can see the complete table on this link here:

Keep in mind that I will be using a new and fresh WordPress installation to proceed with the first part of the tutorial. For the second part, where we will be importing Yoast settings into the Rank Math, I will be using one of my sites, and I will blur some images.
PART ONE: RANK MATH ON NEW WEBSITE
STEP ONE: Download/Upload/Installation
First of all, we need to download the Rank Math plugin from their official page, and you can do that by visiting this link.

After downloading, just go and upload the plugin, install, and activate. I will not be showing this step by step, because I assume you already know that.
The next thing after installation/activation, you will see this:

Click on the connect button, and you will see this:

Select the option you prefer the most. I will click on the "Register Now" link and select the email option.

And we just need to say "OK" here:

You will receive an email with Rank Math login details, so save them somewhere.
STEP TWO: Getting Started/Setting everything up to work
We will be playing with the options right now. Everything is connected and will be working, but we need to say to Rank Math what kind of options we want and how we want this plugin to run.

The default choice will be "Advanced," and I will keep it as is. I want to have more control over the plugin. It's all up to you. Click on the "Start Wizard" button.
Now, you will be asked if you want to import data from Yoast, and in this part one, we are not going to that, so I will click the "Skip, Don't Import Now' button.
You need to select your site, and mine is a shop, fill the Company Name, add the logo, and default social share image. This step is really cool, because I can set up everything here.

For the sake of this tutorial, I will connect this site to the Google Search Console, so click here on "Get Authorization Code".
Now copy the code and paste it. It will authorize immediately.

My website is not listed there, because I didn't create a new property there. Let me do that and let's continue. If you don't have a property, you should do that clicking on "Is your site not listed? Click here to get your website verified.".

You have to click on that link, and you will get the code you need to paste in that field. After that, go back on Google Search Console, and click "Verify".
Again, the sitemaps option is up to you, and what you want to be visible there. These are my options:

SEO Tweaks is one more amazing option. Really, just look at what we have here. I always hated going over and over external links and making them open in a new tab. Now, with this single option, it will be automated for me.
Note: Noindex Empty Category and Tag Archives is enabled by default, but I disabled it.

And we are done with the basic options. Now, let's proceed with some Advanced options, and let's see what they have there.

STEP THREE: Advanced Options
Trust me, and there will be a more amazing option you will like.
The first thing here is Role Manager, and I will not enable this. But this option will allow you to play with roles here, and you can make an editor or any other user be able to change some Rank Math options.

404 Monitor
Within this option, you can configure if you want to monitor 404 and see what visitors are doing, and where they go. Also, if you have been reading my tutorial about making a custom 404 page, here's a redirection option. And we will be talking later on about this option.

Schema Markup
Before the Rank Math plugin, I had to install an additional plugin for the Schema Markup. If you don't know what the Schema Markup is and why should you use it, please read this article.

STEP FOUR: More of Advance Options
The next thing you are going to see is this:

And I will enable "Image SEO" option. After enabling, go to Rank Math > General Settings.
GENERAL SETTINGS
Here we have many more options, and the first one is LINKS. Strip Category Base option is disabled by default, but I don't want that "category" to be visible. I like it more without that.

IMAGES
Yes, I didn't go over breadcrumbs.
If you activate this option, you will see this:

No more missing ALT tags, and this will fix all your images with missing ALT tags you previously uploaded! You can even select what you want to be there, and I will choose both options to be %filename%.
Images option is something that will really help me with my journey blog. I am using so many images, and every time I make a new image for the post, I make a nice name. But every time I upload that image, I need to fill the ALT input.
OTHERS
The main option here is "Show SEO Score," which will show the SEO Score of the page/post/etc., on that page.

But I guess many of you will not enable this option.
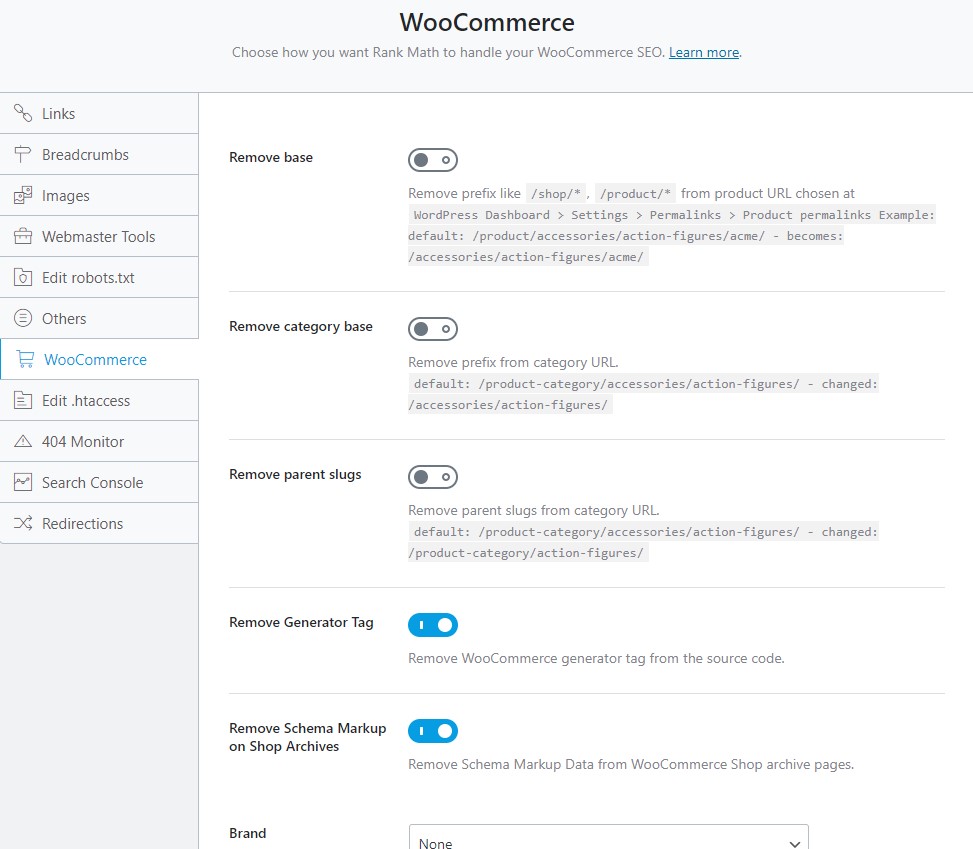
WOOCOMMERCE
Again, this is all up to you and what you like.
REDIRECTIONS
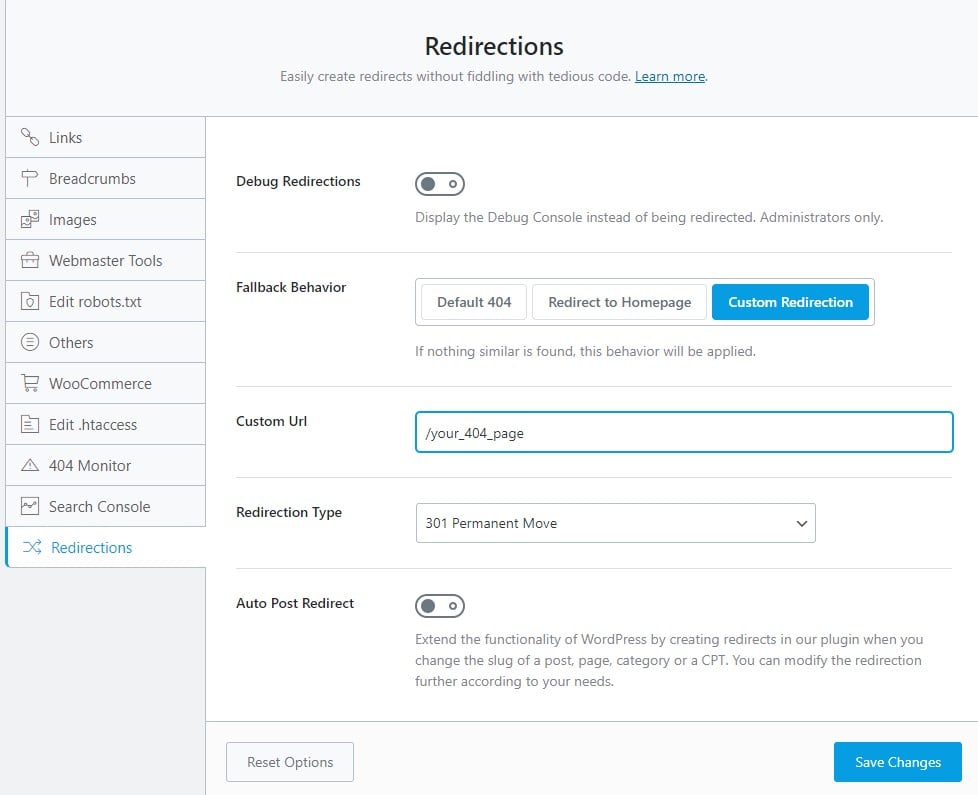
As I said above, if you have been reading my tutorial for the custom 404 pages, this plugin can help you. There is no need to add that function in function.php to make redirections; you can set up the page you want to use for 404 pages.
TITLES AND META
Many, many options here are available for free. I just enabled here Capitalize Titles. If you have a local business, you should go to the "Local SEO" tab and fill up all the information needed.

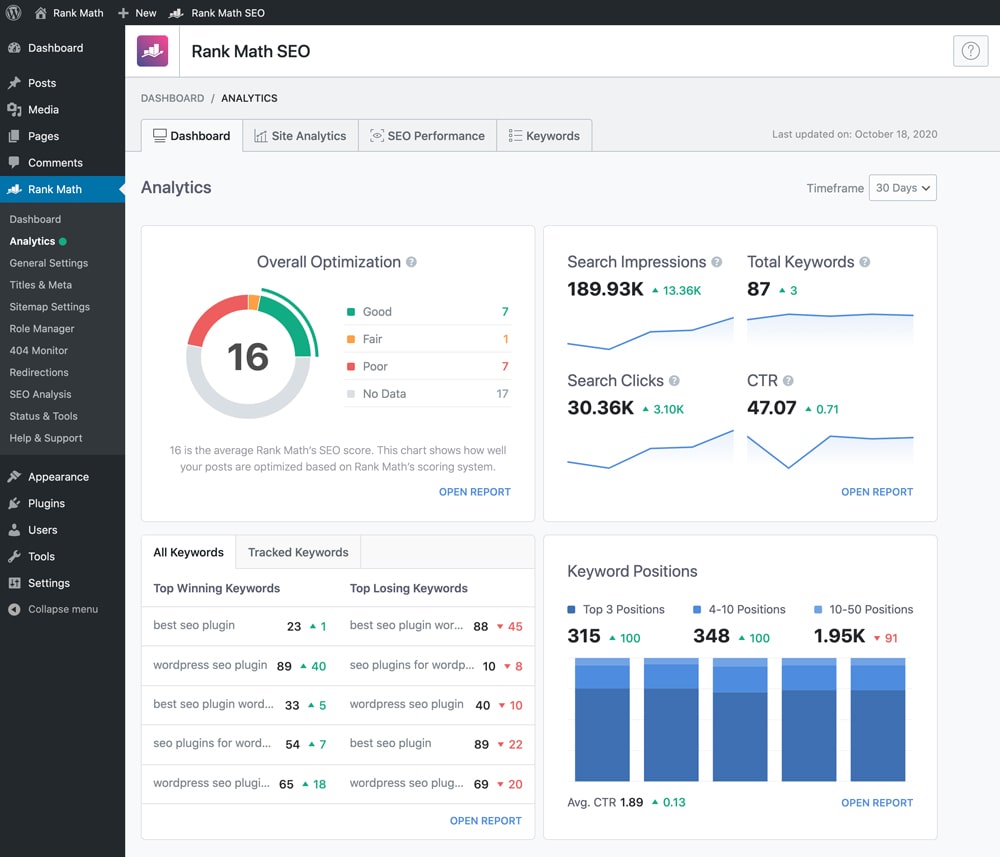
SEARCH CONSOLE
Since this is a new/fresh website, I don't have any data, so I to show you what kind of information you will be able to see here; I will use the image from the Rank Math.
SEO ANALYSIS
In the SEO Analysis you can see more useful information about your site. Before you can see, you will be asked to start.
When you see all of this, you can fix some things to make that score even better.

SITEMAPS AND SEARCH CONSOLE
Don't forget to add your sitemap URL to the Google Search Console. If you don't know what the link is of the sitemap, go to the Rank Math > Sitemap Settings, and you will see the link there.
PART TWO: IMPORT YOAST OPTIONS
All steps are the same, install the plugin, connect with your account.
IMPORT
Here you can select what you want to import from the Yoast plugin. I will import everything I have there. Click "Start Import", and after that, "Continue".

And that's all. All your information be from the Yoast will be there, and some steps will be avoided.
CONCLUSION AND IS IT BETTER THAN YOAST
We all want to know if the Rank Math is better than the Yoast, what is the best SEO WordPress plugin. We all want the best results for our site. When it comes to the results, I cannot tell you that at the moment, you will need to find out that by yourself.
But I can tell you the Rank Math has many more options for free than Yoast. And I know, we all got used to Yoast, and if you decide to switch to the Rank Math, it will be a hard decision to make.
I know that I will switch my sites to this plugin in the next coming weeks and see what will happen. Only from the one reason, it will help me to finish some things faster and better.
Let me hear your opinions about the Rank Math and if this tutorial was useful to you.
WHAT'S RANK MATH?
According to the Rank Math:
"Rank Math is a Search Engine Optimization plugin for WordPress that makes it easy for anyone to optimize their content with built-in suggestions based on widely-accepted best practices. Easily customize important SEO settings, control which pages are indexable, and how you want your website to appear in search with Structured data."
In my view:
As they said, it's an SEO plugin for WP the same as the Yoast, but they have many more free features, and in the Yoast, they are premium.
Here's the comparison table, and you can see the complete table on this link here:
Keep in mind that I will be using a new and fresh WordPress installation to proceed with the first part of the tutorial. For the second part, where we will be importing Yoast settings into the Rank Math, I will be using one of my sites, and I will blur some images.
PART ONE: RANK MATH ON NEW WEBSITE
STEP ONE: Download/Upload/Installation
First of all, we need to download the Rank Math plugin from their official page, and you can do that by visiting this link.
After downloading, just go and upload the plugin, install, and activate. I will not be showing this step by step, because I assume you already know that.
The next thing after installation/activation, you will see this:
Click on the connect button, and you will see this:
Select the option you prefer the most. I will click on the "Register Now" link and select the email option.
And we just need to say "OK" here:
You will receive an email with Rank Math login details, so save them somewhere.
STEP TWO: Getting Started/Setting everything up to work
We will be playing with the options right now. Everything is connected and will be working, but we need to say to Rank Math what kind of options we want and how we want this plugin to run.
The default choice will be "Advanced," and I will keep it as is. I want to have more control over the plugin. It's all up to you. Click on the "Start Wizard" button.
Now, you will be asked if you want to import data from Yoast, and in this part one, we are not going to that, so I will click the "Skip, Don't Import Now' button.
You need to select your site, and mine is a shop, fill the Company Name, add the logo, and default social share image. This step is really cool, because I can set up everything here.
For the sake of this tutorial, I will connect this site to the Google Search Console, so click here on "Get Authorization Code".
Now copy the code and paste it. It will authorize immediately.
My website is not listed there, because I didn't create a new property there. Let me do that and let's continue. If you don't have a property, you should do that clicking on "Is your site not listed? Click here to get your website verified.".
You have to click on that link, and you will get the code you need to paste in that field. After that, go back on Google Search Console, and click "Verify".
Again, the sitemaps option is up to you, and what you want to be visible there. These are my options:
SEO Tweaks is one more amazing option. Really, just look at what we have here. I always hated going over and over external links and making them open in a new tab. Now, with this single option, it will be automated for me.
Note: Noindex Empty Category and Tag Archives is enabled by default, but I disabled it.
And we are done with the basic options. Now, let's proceed with some Advanced options, and let's see what they have there.
STEP THREE: Advanced Options
Trust me, and there will be a more amazing option you will like.
The first thing here is Role Manager, and I will not enable this. But this option will allow you to play with roles here, and you can make an editor or any other user be able to change some Rank Math options.
404 Monitor
Within this option, you can configure if you want to monitor 404 and see what visitors are doing, and where they go. Also, if you have been reading my tutorial about making a custom 404 page, here's a redirection option. And we will be talking later on about this option.
Schema Markup
Before the Rank Math plugin, I had to install an additional plugin for the Schema Markup. If you don't know what the Schema Markup is and why should you use it, please read this article.
STEP FOUR: More of Advance Options
The next thing you are going to see is this:
And I will enable "Image SEO" option. After enabling, go to Rank Math > General Settings.
GENERAL SETTINGS
Here we have many more options, and the first one is LINKS. Strip Category Base option is disabled by default, but I don't want that "category" to be visible. I like it more without that.
IMAGES
Yes, I didn't go over breadcrumbs.
If you activate this option, you will see this:
No more missing ALT tags, and this will fix all your images with missing ALT tags you previously uploaded! You can even select what you want to be there, and I will choose both options to be %filename%.
Images option is something that will really help me with my journey blog. I am using so many images, and every time I make a new image for the post, I make a nice name. But every time I upload that image, I need to fill the ALT input.
OTHERS
The main option here is "Show SEO Score," which will show the SEO Score of the page/post/etc., on that page.
But I guess many of you will not enable this option.
WOOCOMMERCE
Again, this is all up to you and what you like.
REDIRECTIONS
As I said above, if you have been reading my tutorial for the custom 404 pages, this plugin can help you. There is no need to add that function in function.php to make redirections; you can set up the page you want to use for 404 pages.
TITLES AND META
Many, many options here are available for free. I just enabled here Capitalize Titles. If you have a local business, you should go to the "Local SEO" tab and fill up all the information needed.
SEARCH CONSOLE
Since this is a new/fresh website, I don't have any data, so I to show you what kind of information you will be able to see here; I will use the image from the Rank Math.
SEO ANALYSIS
In the SEO Analysis you can see more useful information about your site. Before you can see, you will be asked to start.
When you see all of this, you can fix some things to make that score even better.
SITEMAPS AND SEARCH CONSOLE
Don't forget to add your sitemap URL to the Google Search Console. If you don't know what the link is of the sitemap, go to the Rank Math > Sitemap Settings, and you will see the link there.
PART TWO: IMPORT YOAST OPTIONS
All steps are the same, install the plugin, connect with your account.
IMPORT
Here you can select what you want to import from the Yoast plugin. I will import everything I have there. Click "Start Import", and after that, "Continue".
And that's all. All your information be from the Yoast will be there, and some steps will be avoided.
CONCLUSION AND IS IT BETTER THAN YOAST
We all want to know if the Rank Math is better than the Yoast, what is the best SEO WordPress plugin. We all want the best results for our site. When it comes to the results, I cannot tell you that at the moment, you will need to find out that by yourself.
But I can tell you the Rank Math has many more options for free than Yoast. And I know, we all got used to Yoast, and if you decide to switch to the Rank Math, it will be a hard decision to make.
I know that I will switch my sites to this plugin in the next coming weeks and see what will happen. Only from the one reason, it will help me to finish some things faster and better.
Let me hear your opinions about the Rank Math and if this tutorial was useful to you.


