
blackdragonbee
Newbie
- Mar 31, 2021
- 47
- 10
Thanks for your nice post, can we create multi images at the same time?


Yes, you can create multiple images at the same time, but you'll experience a longer render time.Thanks for your nice post, can we create multi images at the same time?
Thank you, I just need some huge sample images for my content, they are unique so it will be great.Yes, you can create multiple images at the same time, but you'll experience a longer render time.

This is killer. Will this work on ma evenctually?I'm a big fan of AI, especially when it's used to help with easing workload or as a source of artistic inspiration.
We are all aware that there are numerous tools available for AI image generation, the two most popular of which being DALL-E 2 and MidJourney.
DALL-E charges $0.13 USD to generate one prompt (3 pictures). MidJourney is a subscription-based service, with unlimited usage costing $30.00 USD each month.
Now, what if I were to tell you that you can generate equally good images, if not sometimes better, for FREE using your PC?
Well, that's what Stable Diffusion is for!
Don't believe me? Here are some samples, created for free, using my computer:


Prompt: tiny cute grape plush stuffed toy, anthropomorphic, surrounded by vines, pixar style eyes, pokemon anime style, octane render, fantasy, volumetric light, soft cinematic lighting, tinycore, cutecore, purplecore, realisitic, 8k
I hope this proves it, so without further ado, let's get straight into it.
Disclaimer: You will need a good graphics card. I'm running an RTX 2070 and generating images over 512x512 makes the GPU run out of memory.
>> How To Generate UNLIMITED high quality images using AI for FREE
Step 1. Install Anaconda
Source: https://www.anaconda.com/
Anaconda is a distribution of the Python and R programming languages for scientific computing.
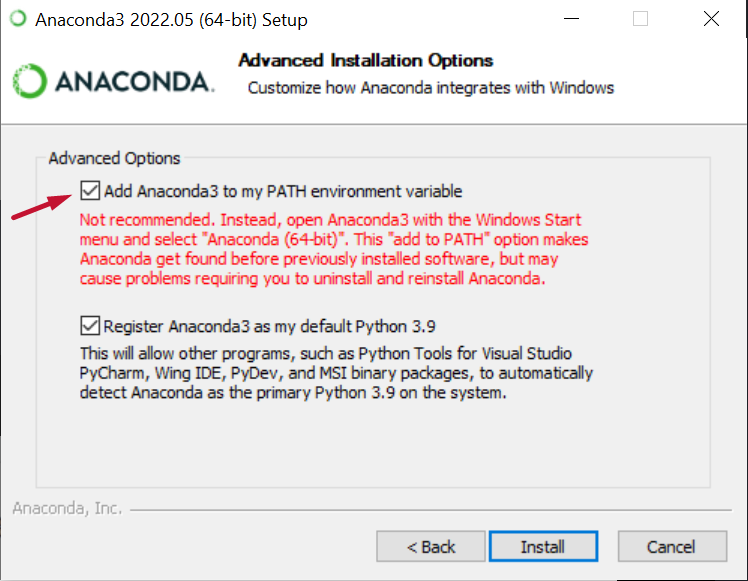
The download and installation should be straight forward, but there is an important step you have to do, and that is checking the box for adding Anaconda to your PATH environment variables.
Step 2. Install Git
Source: https://git-scm.com/downloads
Git is free and open source software for distributed version control.
No special requirements for the installation.
Step 3. Git clone the stable-diffusion-webui repo
Disclaimer: A restart might be needed in order for Anaconda/Git to work.
Source: https://github.com/AUTOMATIC1111/stable-diffusion-webui
Open your CMD, cd (https://www.onmsft.com/how-to/change-directories-command-prompt-windows-10-11) to the folder you'd like to clone the above repo to, and type "git clone https://github.com/AUTOMATIC1111/stable-diffusion-webui" in your CMD.
The cloning should not take long, as the files are not big.
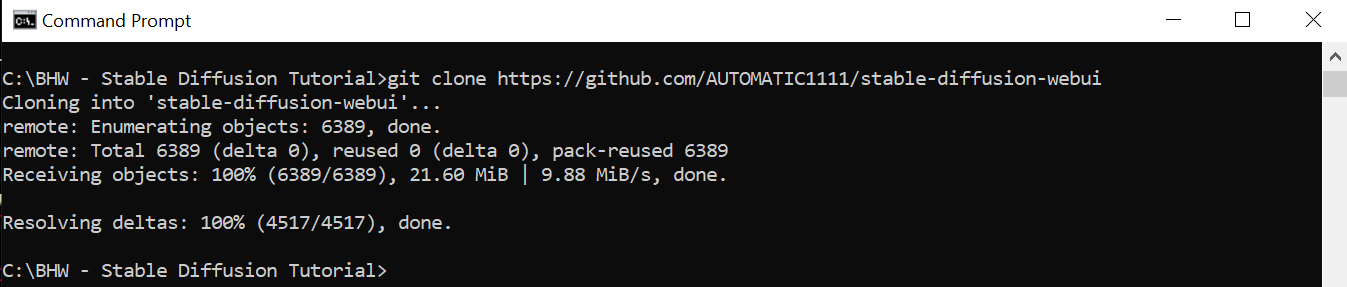
Don't worry, the repo is virus-free. I mean, with 13.1k stars on GitHub it should very well be, but just to be completely sure, MalwareBytes goes into action.

You can close your CMD.
Step 4. Download the Stable Diffusion model
Source: https://huggingface.co/CompVis/stable-diffusion-v-1-4-original
You will have to create an account on HuggingFace before being able to download the model.
Once you've created the account, download the sd-v1-4.ckpt weight.

The file will be 4GB in size, so make sure you have enough space.
Again, with it's popularity we shouldn't even worry about viruses, but again, let's just be sure. MalwareBytes, what do you think?

Step 5. Add the Stable Diffusion model to the WebUI kit we cloned
Sounds hard? Well, it's not.
Simply go to where you cloned the repo in step 3, go to the following folder: stable-diffusion-webui -> models -> Stable-diffusion, and paste here the sd-v1-4.ckpt file we downloaded in step 4.

Step 6. Open the WebUI kit and have fun!
All you have to do now is to go to the main "stable-diffusion-webui" folder and open the WebUI kit by double clicking on webui-user.bat file.
When you do it for the first time, it will take a few minutes because the dependencies the kit requires need to be installed, after that the kit will load pretty fast.
Once the kit loads, it will provide you with an IP address.

Simply copy that address and paste it in your browser.
That's it, you now have a full version of Stable Diffusion, right there on your computer, for you to use anytime you want, for FREE!

I won't go into everything you can do with the webUI kit, that's for you to try out on your own.
But, just to get your feet wet, write something in the "prompt" input area, then click the big orange "Generate button", magic will happen.
I hope this helps some of you have an easier start in the world of AI!
Happy generating!


