

vibedz
Regular Member
- Nov 4, 2016
- 385
- 66
Hi Guys today i'm gonna show you how to push GGL to Crawl you website Instantly .
we’re going to take a look at how you can use GGL’s new indexing API to get your website’s pages and content crawled immediately rather than having to wait!
Here’s why this really is worth the extra effort.
Rank faster (especially important for time-sensitive content)
Increase your chances of ranking above your competition
Keep search results up-to-date for higher quality user traffic
Using this method, you can stay one step ahead of your competition by making sure that your site is crawled and has the opportunity to rank before their site does which is extremely important when it comes to time-sensitive, competitive content.
The process of setting this up isn’t typically very easy, but if you follow this step-by-step guide, you’ll be up and running (or, I guess you could say up and ranking) in no time! So, without further ado – let’s jump right in and take a look at how to set this up.
Follow the steps :
Download Plugin Files
Download RankMath SEO PLUGIN
Steps to Create an API Project
2.1 Go to Google API Console
2.2 Create a Service Account
2.3 Add the Service Account as an owner
Configure the Plugin
3.1 Add API Key
3.2 Send first indexing request to Google
1- Download Plugin Files from here : https://s.rankmath.com/downloadapifiles
VirusTotal: https://www.virustotal.com/gui/url/...73dc8bbc8e9090fa75586786d2f10ba1370/detection
2- Steps to Create an Indexing API Project
Go to the Google API Console and create a new project
Ensure that you’re creating a new Indexing API project which you can do automatically by clicking here. And then click continue.
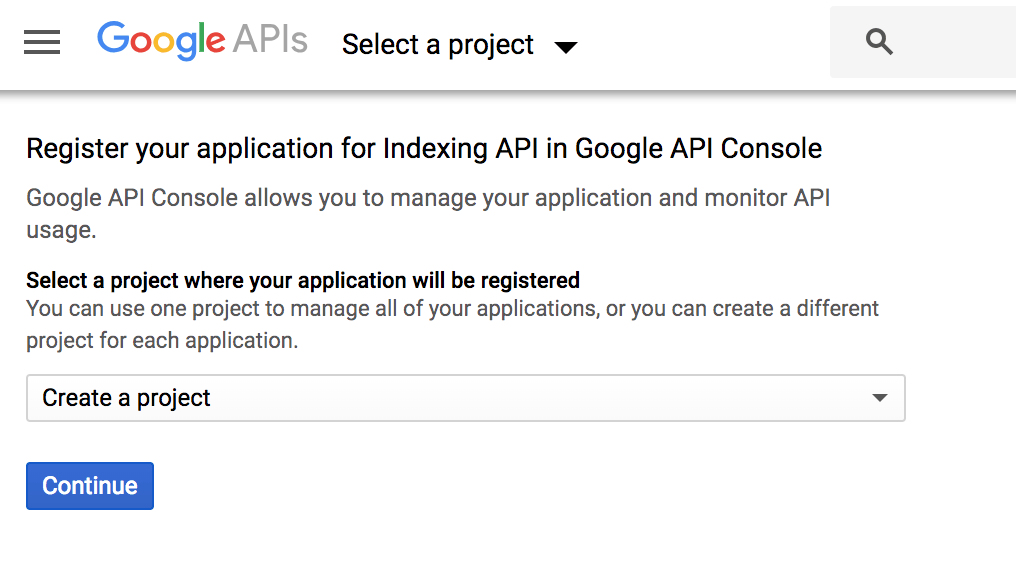
If you see the following screen then you’ve successfully created the project:
Now create a Service Account
Once you’ve created your project, create a service account by opening the service accounts page. And, if prompted, select the project you just created using the button near the top of the page:
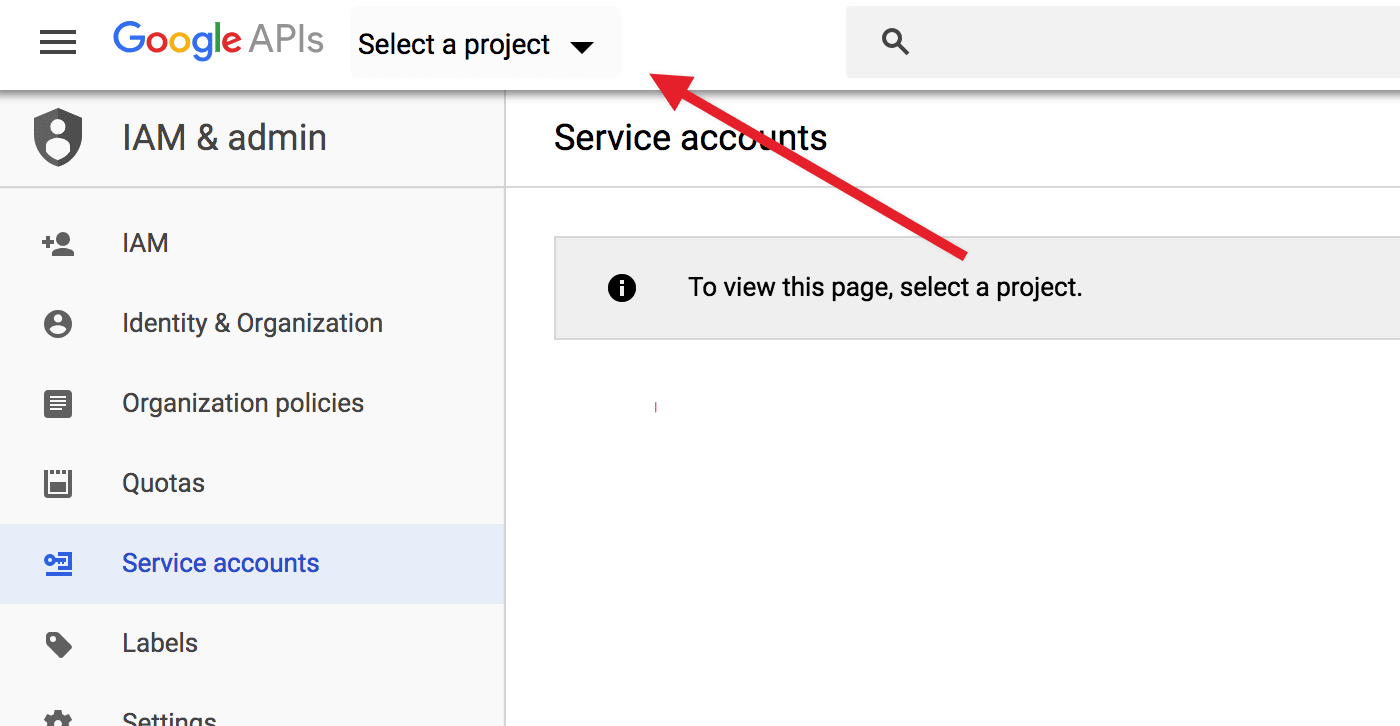
And once you have selected a project, click the Create Service Account button highlighted below:
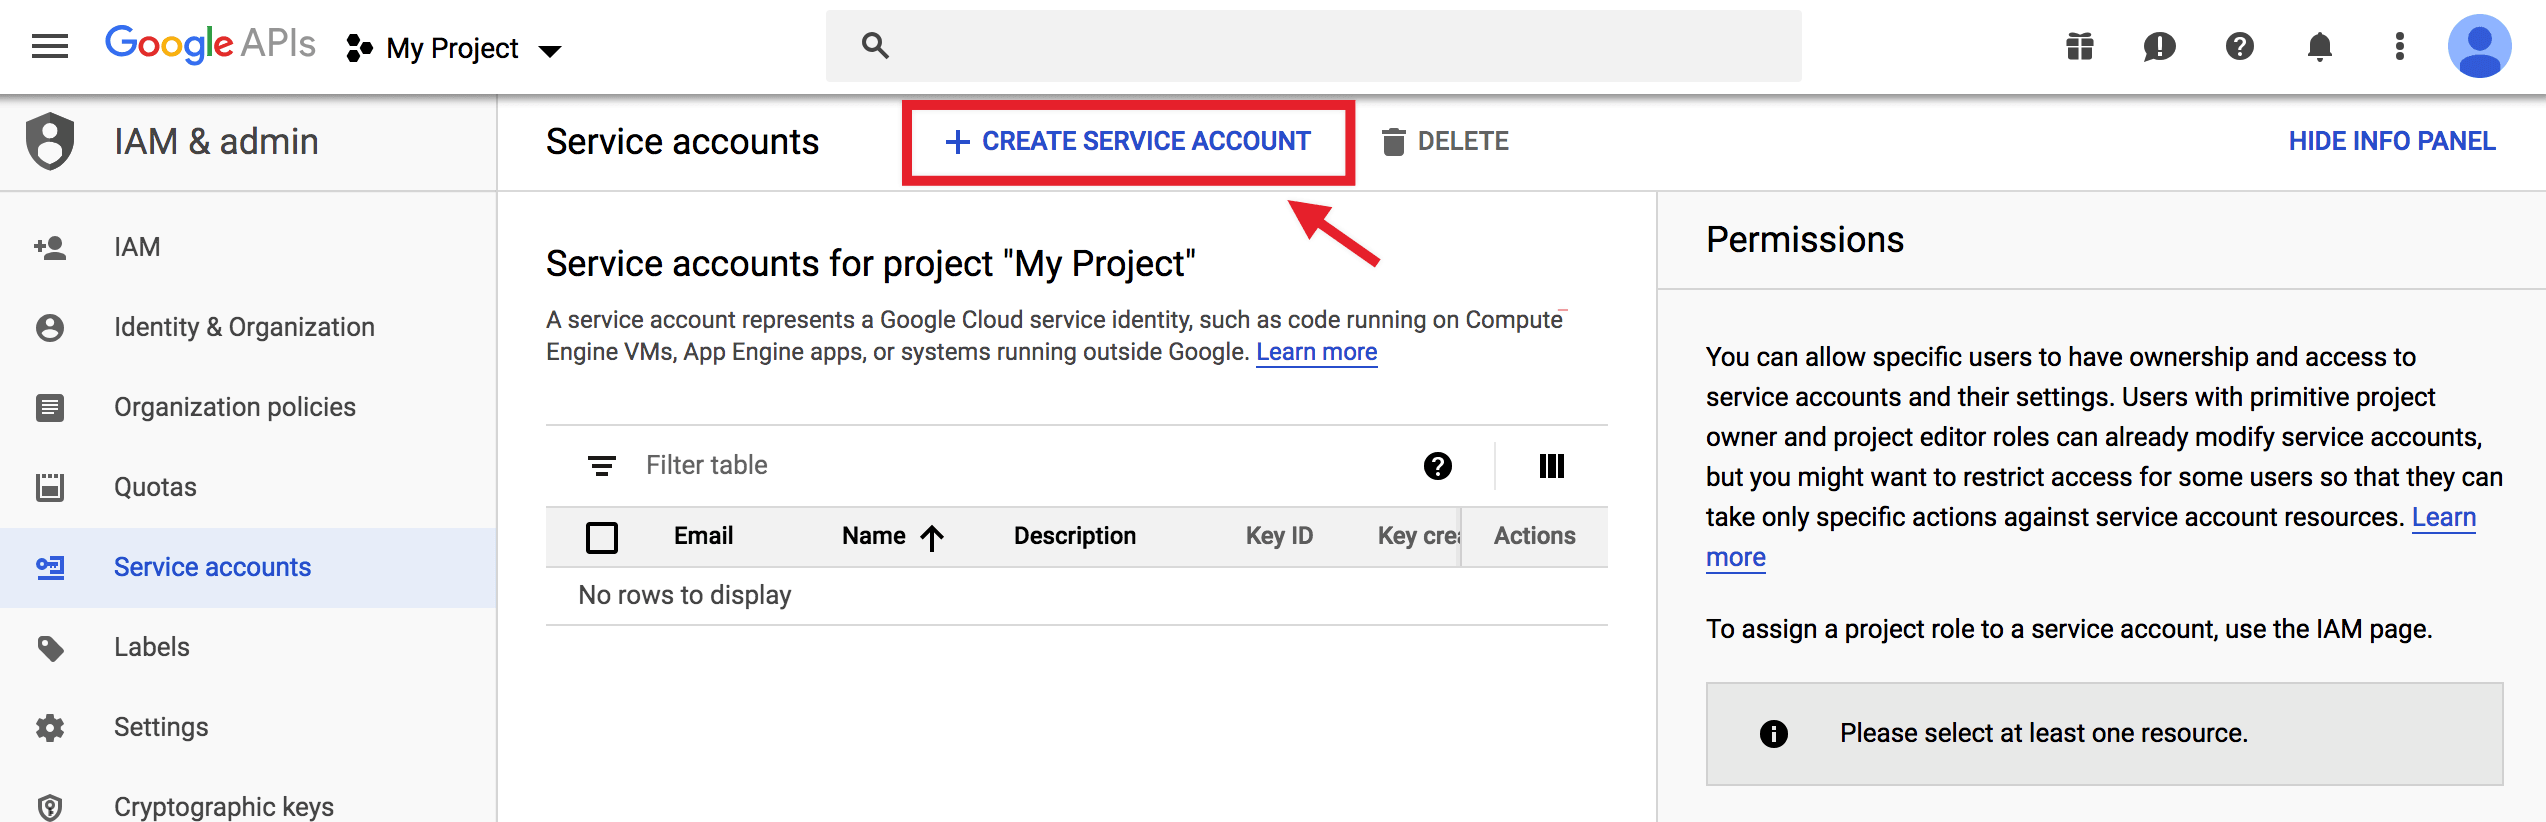
On the Create service account screen, enter a name and description for the newly created service account.
Select and copy the whole Service Account ID (the one that looks like an email address) because you will need it later. Then, click on the Create button at the bottom:

Once you’re taken to the next page, don’t forget to change the role to Owner and, as you might’ve guessed, click continue…
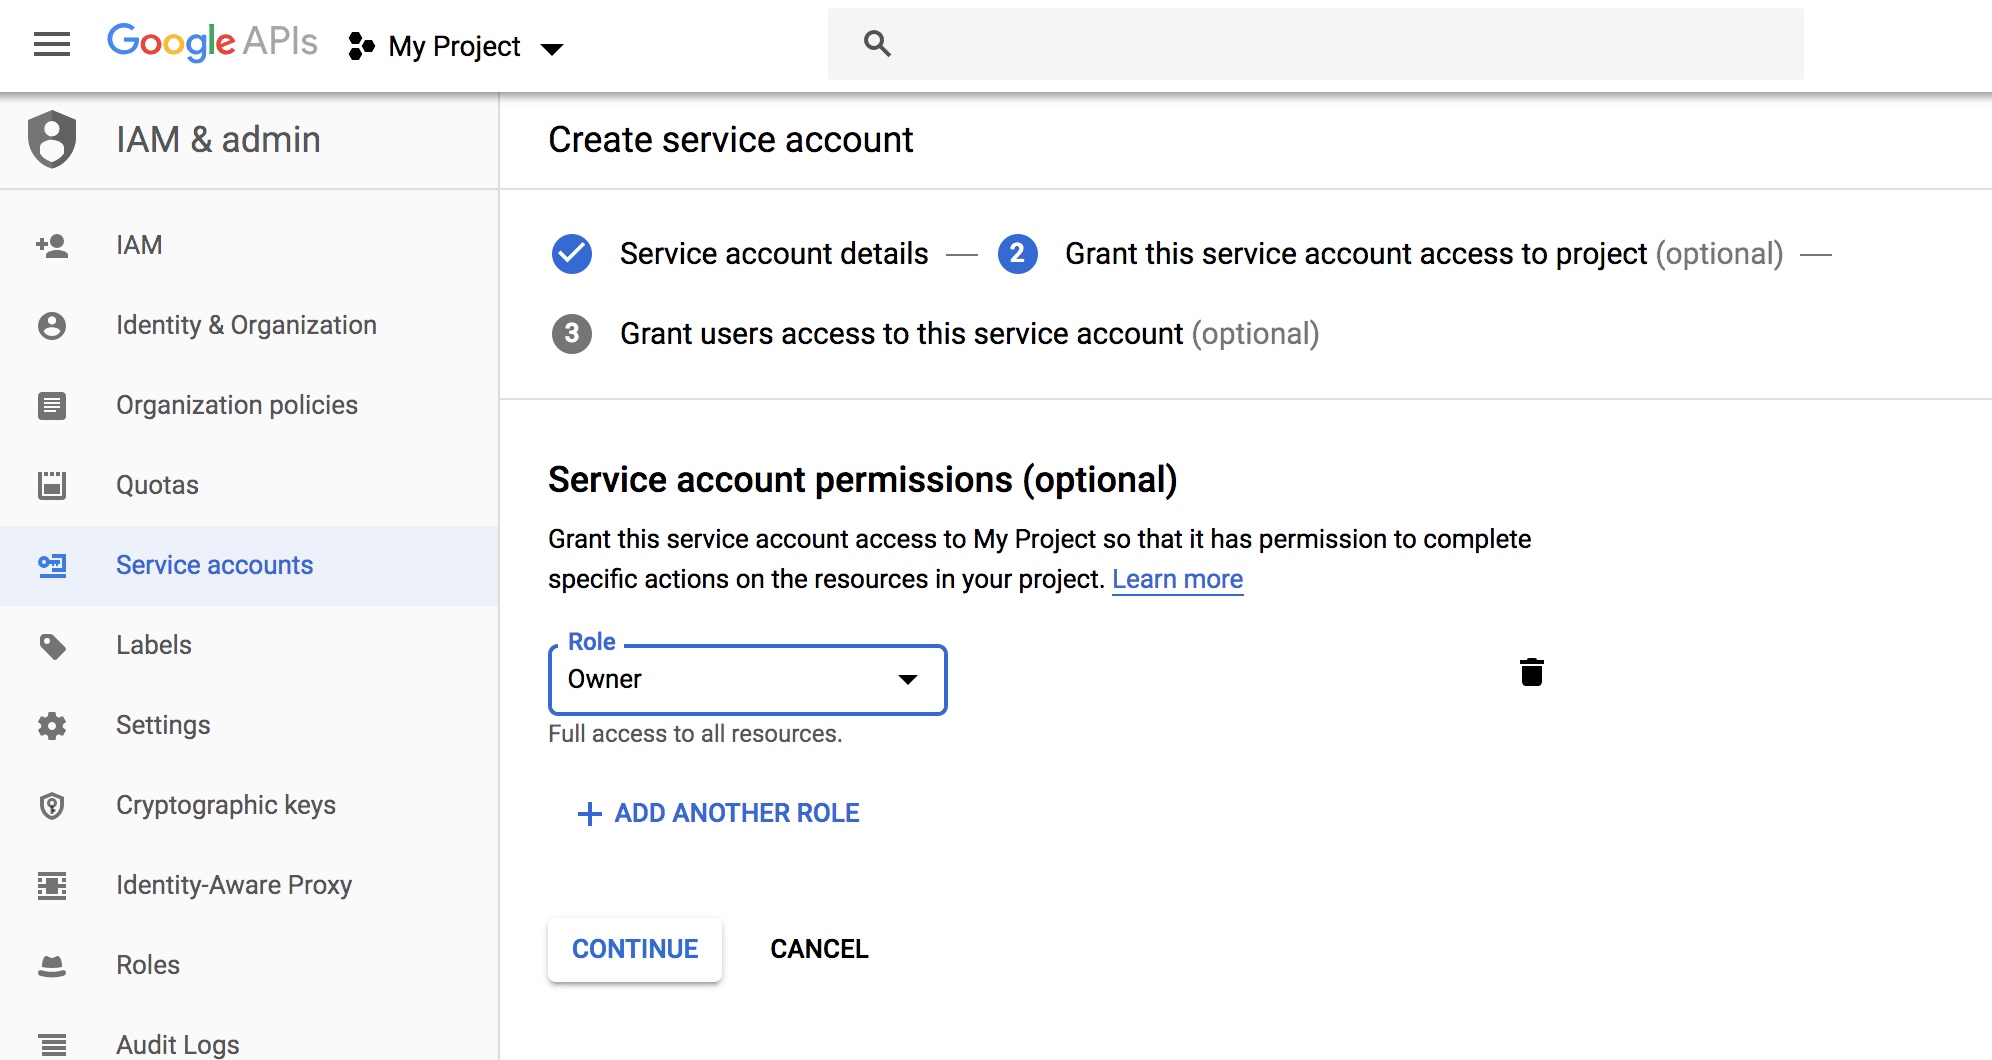
Now download the file that contains your API key by clicking the Create Key button:

Choose the default JSON format when prompted in the overlay, and click Create:

Add the Service Account as an owner of your Google Search Console Property
To do this, you’ll need to register and verify your website with the Google Search Console (if you haven’t done so already) which is super easy:
After verifying your property, open the Google Search Console, select your property on the left (if prompted), and then click on Settings near the bottom:

Click on Users and Permissions:
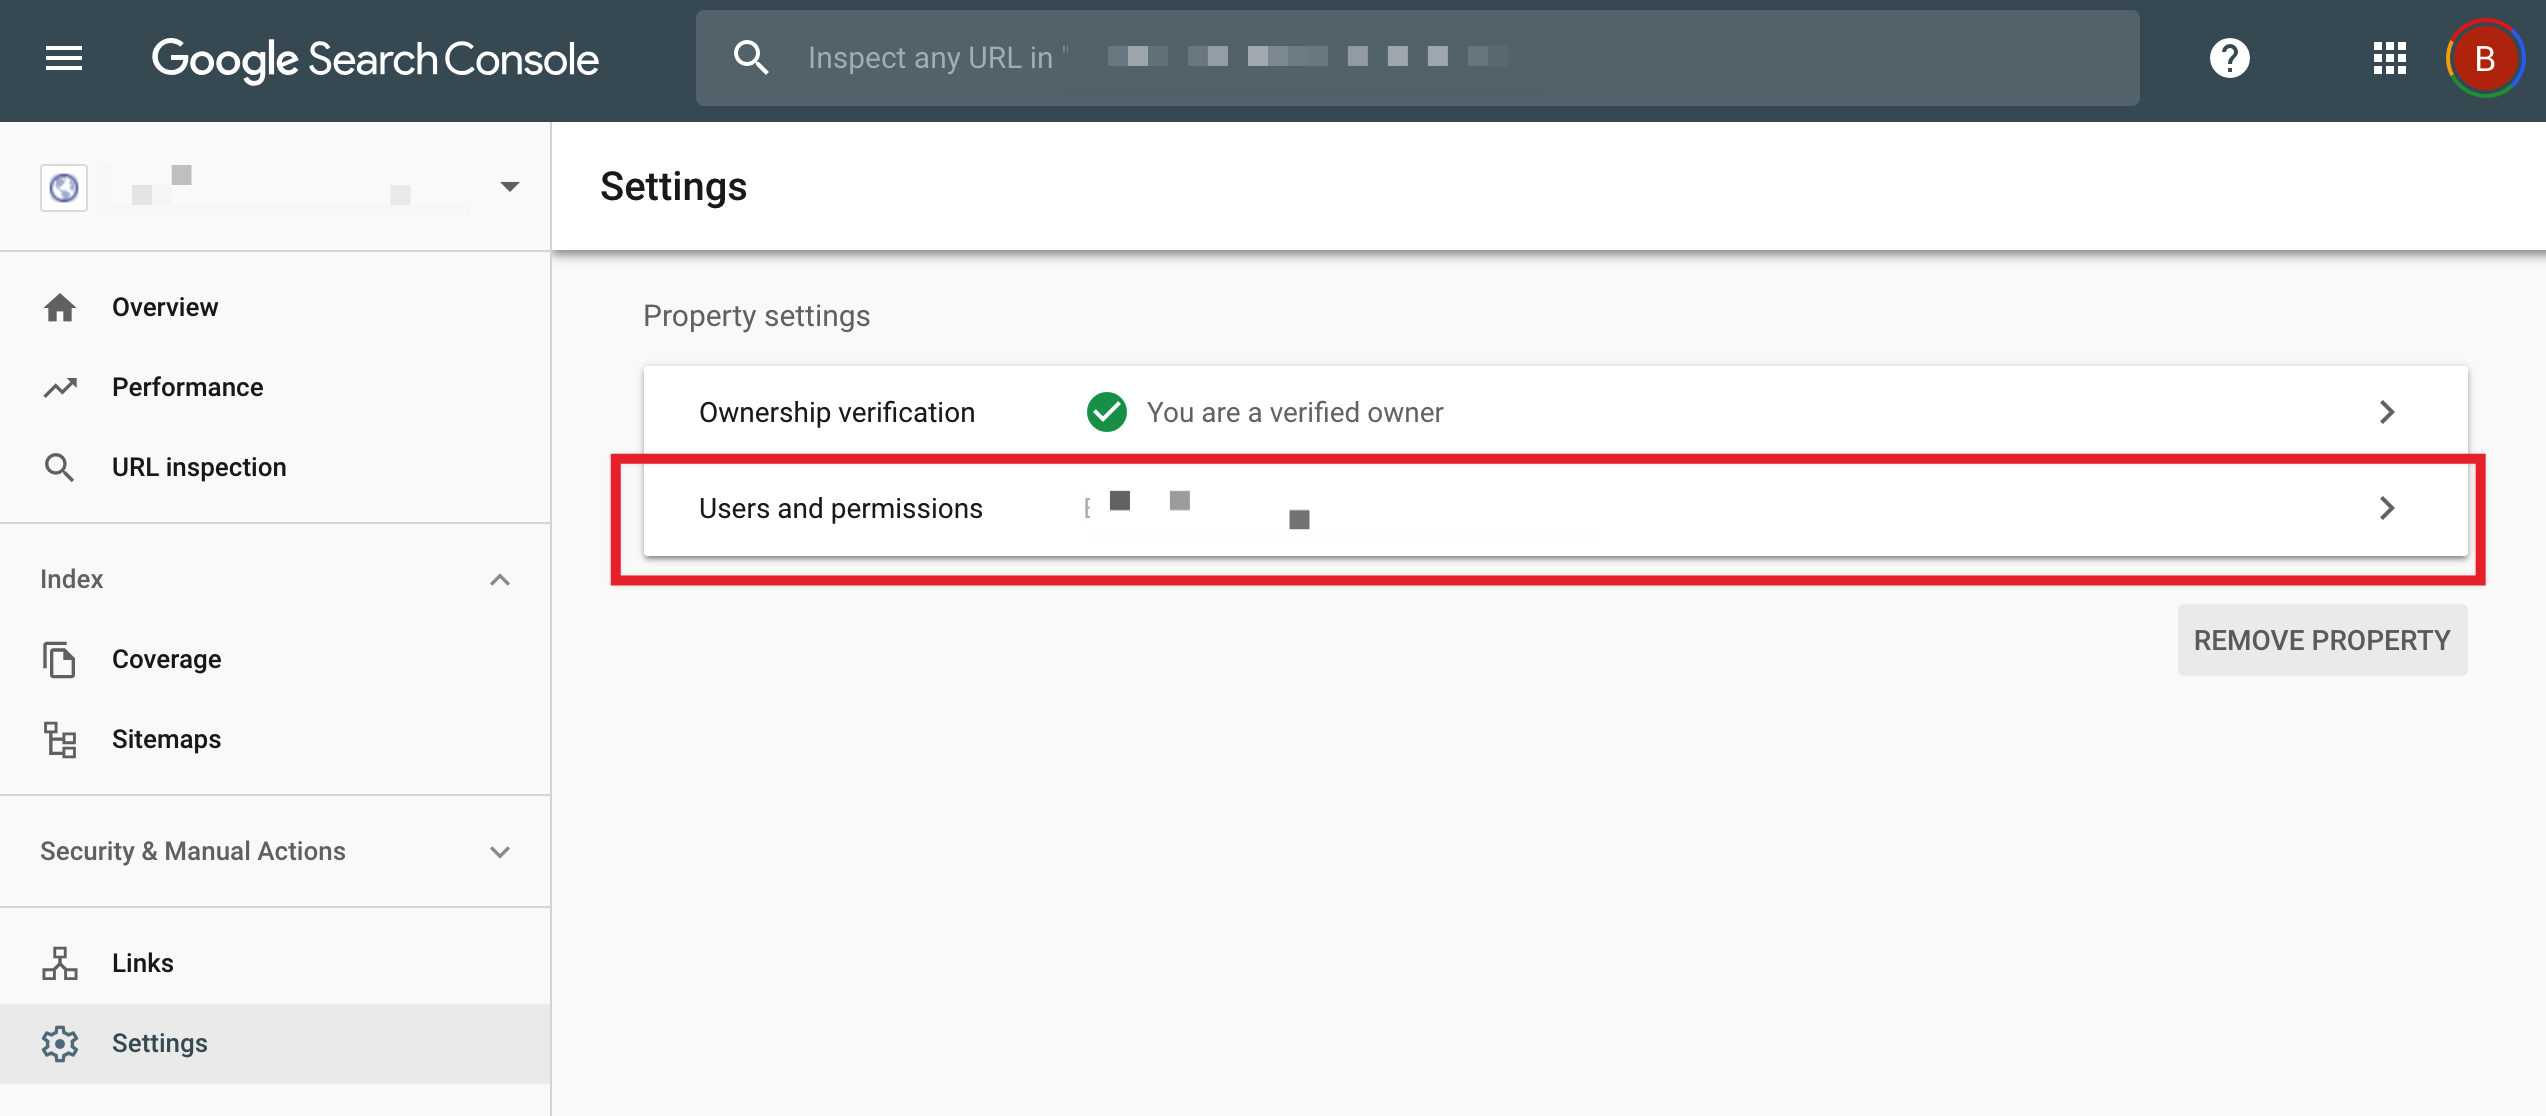
Click on the three dots next to your account, and then click on Manage property owners:

A page will open in a new tab. Scroll to the bottom and click on the Add an owner button in the Verified owners section:

A page will open in a new tab. Scroll to the bottom and click on the Add an owner button in the Verified owners section:

Enter the Service account ID (the one you copied out earlier) in the new owner’s email address field and click Continue:
https://i.imgur.com/lzbXMSN.png
Switch back to the previous tab and refresh it. You should now see the Service account listed as a new Owner.
Configure the Plugin
3.1 Insert your API Key in the plugin settings
Just navigate to Rank Math > Indexing API Settings in your WordPress admin area, and paste in the contents of your JSON file, or just upload the file. Select the Post Types where you want the Indexing API to ping Google to crawl your website as soon as a post is published, updated, or deleted and click on Save Changes.

Now it’s time to use Google’s indexing API to get any post or page on your site indexed almost instantly.

Access Plugin’s Console Page from the Dashboard.

Submit the Page.

Check the status of already submitted URL.
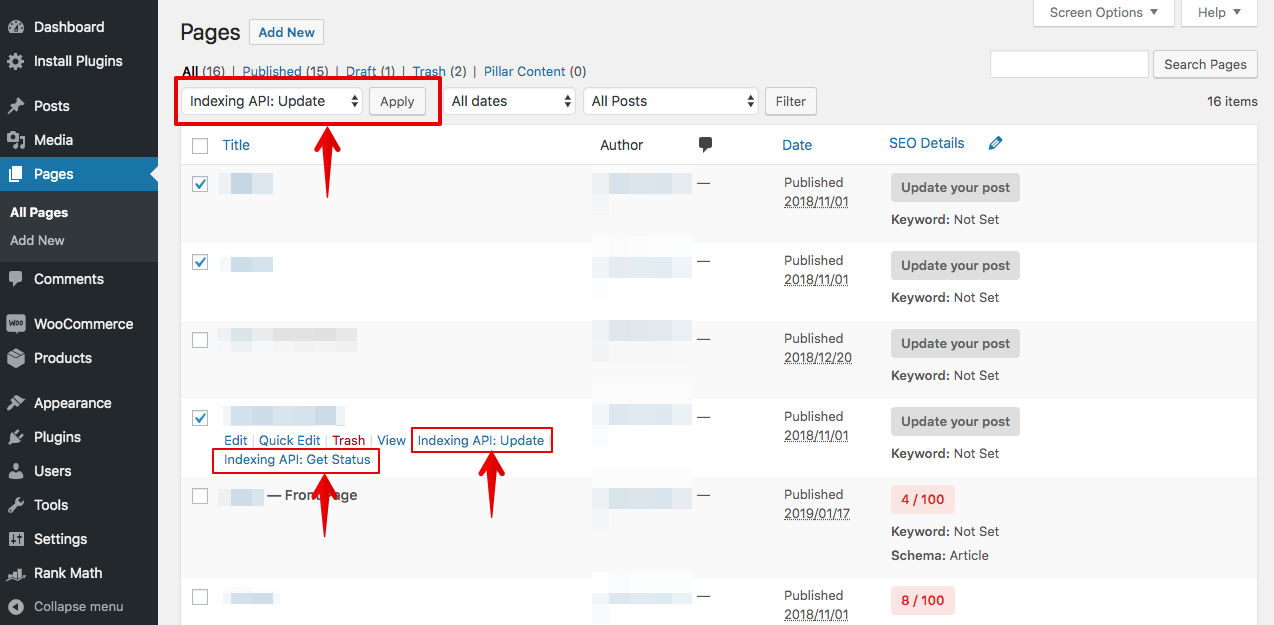
Use the quick action links and the bulk submit functionality.
And that’s it! We hope that you were able to make great use of this guide to help you get up and running with GGle’s Indexing API.
That's it !
Note : 403 Indexing API has not been used in the project [project name] before or it is disabled. Enable it by visiting then retry. Copy and paste the U...is/library/indexing.googleapis.com']this page and select your project in the dropdown near the top, then enable the API:

Thanks Folks
we’re going to take a look at how you can use GGL’s new indexing API to get your website’s pages and content crawled immediately rather than having to wait!
Here’s why this really is worth the extra effort.
Rank faster (especially important for time-sensitive content)
Increase your chances of ranking above your competition
Keep search results up-to-date for higher quality user traffic
Using this method, you can stay one step ahead of your competition by making sure that your site is crawled and has the opportunity to rank before their site does which is extremely important when it comes to time-sensitive, competitive content.
The process of setting this up isn’t typically very easy, but if you follow this step-by-step guide, you’ll be up and running (or, I guess you could say up and ranking) in no time! So, without further ado – let’s jump right in and take a look at how to set this up.
Follow the steps :
Download Plugin Files
Download RankMath SEO PLUGIN
Steps to Create an API Project
2.1 Go to Google API Console
2.2 Create a Service Account
2.3 Add the Service Account as an owner
Configure the Plugin
3.1 Add API Key
3.2 Send first indexing request to Google
1- Download Plugin Files from here : https://s.rankmath.com/downloadapifiles
VirusTotal: https://www.virustotal.com/gui/url/...73dc8bbc8e9090fa75586786d2f10ba1370/detection
2- Steps to Create an Indexing API Project
Go to the Google API Console and create a new project
Ensure that you’re creating a new Indexing API project which you can do automatically by clicking here. And then click continue.
If you see the following screen then you’ve successfully created the project:
Now create a Service Account
Once you’ve created your project, create a service account by opening the service accounts page. And, if prompted, select the project you just created using the button near the top of the page:
And once you have selected a project, click the Create Service Account button highlighted below:
On the Create service account screen, enter a name and description for the newly created service account.
Select and copy the whole Service Account ID (the one that looks like an email address) because you will need it later. Then, click on the Create button at the bottom:
Once you’re taken to the next page, don’t forget to change the role to Owner and, as you might’ve guessed, click continue…
Now download the file that contains your API key by clicking the Create Key button:
Choose the default JSON format when prompted in the overlay, and click Create:
Add the Service Account as an owner of your Google Search Console Property
To do this, you’ll need to register and verify your website with the Google Search Console (if you haven’t done so already) which is super easy:
After verifying your property, open the Google Search Console, select your property on the left (if prompted), and then click on Settings near the bottom:
Click on Users and Permissions:
Click on the three dots next to your account, and then click on Manage property owners:
A page will open in a new tab. Scroll to the bottom and click on the Add an owner button in the Verified owners section:
A page will open in a new tab. Scroll to the bottom and click on the Add an owner button in the Verified owners section:
Enter the Service account ID (the one you copied out earlier) in the new owner’s email address field and click Continue:
https://i.imgur.com/lzbXMSN.png
Switch back to the previous tab and refresh it. You should now see the Service account listed as a new Owner.
Configure the Plugin
3.1 Insert your API Key in the plugin settings
Just navigate to Rank Math > Indexing API Settings in your WordPress admin area, and paste in the contents of your JSON file, or just upload the file. Select the Post Types where you want the Indexing API to ping Google to crawl your website as soon as a post is published, updated, or deleted and click on Save Changes.
Now it’s time to use Google’s indexing API to get any post or page on your site indexed almost instantly.
Access Plugin’s Console Page from the Dashboard.
Submit the Page.
Check the status of already submitted URL.
Use the quick action links and the bulk submit functionality.
And that’s it! We hope that you were able to make great use of this guide to help you get up and running with GGle’s Indexing API.
That's it !
Note : 403 Indexing API has not been used in the project [project name] before or it is disabled. Enable it by visiting then retry. Copy and paste the U...is/library/indexing.googleapis.com']this page and select your project in the dropdown near the top, then enable the API:
Thanks Folks


