

- Nov 8, 2005
- 157
- 584
Similarly to my thread in the video production section, I was cleaning this section up when I noticed we didn't have any good stickies here outside of the rules thread. As such, I'm going to follow a similar format as I did with the video production thread.
For some background, it's even more apparent that I often edit photos and share them on the forum for fun as I've been doing this since I joined (a couple of examples here and here). However, I did used to edit photos and do design work for a large variety of occasions and clients (usually wedding photos and some businesses and Los Angeles respectively).
In this guide, I'll be going over various types of software, techniques, and resources that'll help you get started with photo editing.
Photo Editing Techniques
This will depend entirely on what kind of photos you wish to edit. As previously stated, I used to work on wedding photos, so a large portion of my work involved cleaning up acne, blemishes, fixing lighting, cleaning up the background, and removing unsightly appearances on guests and clothing. I may come back to this thread at a later date to include more examples, but I'll go over a few of them below for the sake of the guide.
Additionally, I'll be providing some examples photos that I've worked on specifically for this thread to show how it's done.
Torn clothing
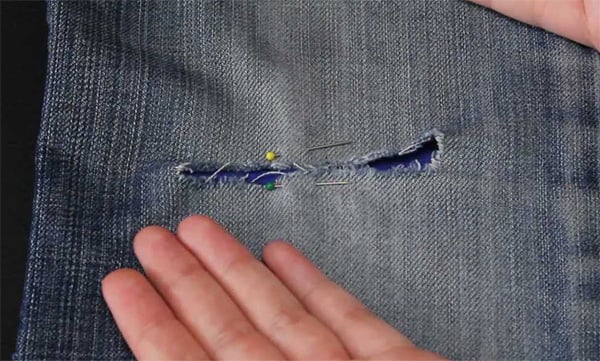
In the example image above, you can see that there's a nasty rip in the pants that's been shoddily "fixed" with a pin. We're going to properly fix it with Photoshop.
The first tool you'll want to use is the clone stamp tool. When using the clone stamp tool, it's important to analyse the surroundings of the area you want to edit. In this case, noting the vertical pattern in the jeans will allow us to make a much cleaner fix. So once you've selected the clone stamp tool, you'll want to select the sample area slightly above your work area and make nice, gentle strokes downward, keeping the pattern of the jeans in mind.

As you can see, this is much better, but this isn't perfect. We want to clean this up a bit more to make it slightly more presentable.
There are lots of ways to go about this, but what I did here was take a sample of the upper-area of the jeans using the selection tool, pasted this into its own layer a few times, and reduced the opacity to about 10%. This remove the unsightly leftovers from the original patchwork.

Acne & Blemishes
A common issue photo editors run into is that when they edit out blemishes, they over-do it and make the face look too airbrushed, resulting in an ugly plastic look.
Ideally, we want to avoid this.
So to start, here's our example image:
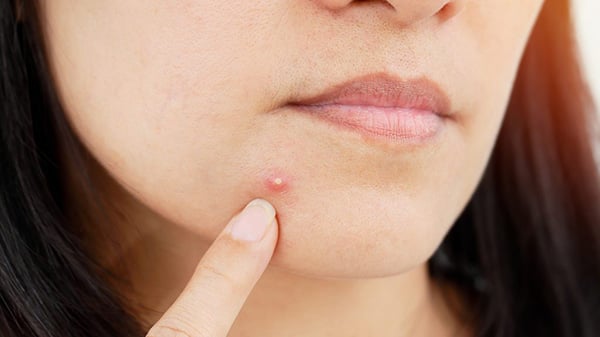
We want to get rid of that nasty blemish. Photoshop actually has a tool for this kind of situation called the spot healing tool. Now, this tool works in about 70% of situations. The times it doesn't work are when the blemish is surrounded by odd lighting or a foreign object, in this case a finger. Still, we're going to use the tool to start it off by cleaning up what we can whilst trying not to use the tool too close to the finger.

Better, but eh, not great. You can still see the area where the blemish was, and that's what we want to work on next.
You could use the clone stamp tool for this, but I wanted to work on this one a bit differently to avoid using the same tool over and over again for this guide. So I went with using the dropper tool on the skin nearby the blemish, using the paint brush tool with the hardness turned down on the skin irritation, brushing over the red area in a new transparent layer, turning on overlay, and reducing the opacity to 20%.

Admittedly, this one turned out okay, but I know I could've done it better. Still, you get the point.
Background Issues
Background issues range from simple to complicated. Normally, you're not going to be working on background issues that are really close up like the image below is, so you don't have to put a ton of effort into making it spotless.
In the example image below, we'll be remove an outlet from the wall. Simple, right? Mostly.

I'm going to give in and use the clone stamp tool to remove the outlet since it's the fastest way to do it and I unfortunately can't spend too long writing these guides up (*looks at inbox to see "Sir, why you writing guides and not reviewing my thread? URGENT RESPONSE NEEDED"*).

So it looks okay, but I used to clone stamp tool a little too close to the door trim, resulting in it looking like I placed it there rather than removed the outlet.
Now, if I weren't pressed for time, I would look into a less lazy way of doing this, but what I'm going to do is use the paint brush tool to add some white underneath the door trim to try to lighten up the area near it, the way it looked originally (and no, copy and pasting the old trim doesn't work without requiring us to go and edit that further.).

This is yet another one I'm not happy with, but again, you won't typically be working on a light switch this close up anyway (unless you edit photos for a light switch company).
Stock Images
As a heads up, in the United States, any photo taken before 1924 belongs to the public domain.
Filters
Textures
Brushes
Vectors
For some background, it's even more apparent that I often edit photos and share them on the forum for fun as I've been doing this since I joined (a couple of examples here and here). However, I did used to edit photos and do design work for a large variety of occasions and clients (usually wedding photos and some businesses and Los Angeles respectively).
In this guide, I'll be going over various types of software, techniques, and resources that'll help you get started with photo editing.
Software
Photo Editing Software- Adobe Photoshop - I use them once this most and it's my preferred software. It's got a lot of tools and many of them are easy to get a good grasp on. Additionally, Photoshop has an extensive number of tutorials, both official and unofficial; so it's very easy to get into.
- Gimp - I've used Gimp in the past when I was on a business trip and I forgot to put Photoshop on my laptop. Personally, I didn't really like it, but it was better than using Microsoft Paint (anything is).
- Microsoft Paint - No... Okay, I'll go over it in more detail. MS Paint is good if you need to quickly add text or arrows to an image for a screenshot guide.
- Canva Pro - I haven't used this one personally, but the bits I do know about it are that it has some drag and drop feature to easily create graphics.
- Adobe Lightroom - Another one I haven't used, but apparently it has an auto-save/catalog feature and is similar to Photoshop. I knew someone who used it to edit their raw photos.
- Adobe Illustrator - Not to be confused with Photoshop, Illustrator is great for creating and editing vectors. I used to use it for some clients I had in Los Angeles to create vector-based logos for apparel and create transparent-background vector images.
- Inkscape - This is another one I haven't used. From what I heard, it's similar to Adobe Illustrator in function, but I can't comment further on it.
- Pixilart.com - My wife used this one recently to create pixel art for a game we're making. It was okay, but she ultimately switched back to Photoshop for pixel art. Still, it's a good alternative for pixel art if you don't have Photoshop.
- Pyxel Edit was recommended to me by @Ozzyzig. It's a paid program that isn't too expensive designed specifically pixel art.
- Affinity Photos - A raster graphics editor. Suggested by @Gogol as a cheaper alternative to Photoshop.
Techniques
General Techniques- For Larger projects, separate your files into folders both on your computer and in Photoshop.
- Zoom in and out of images to get a better of how things look.
- Try re-sizing the photo to have "more to work with".
Photo Editing Techniques
This will depend entirely on what kind of photos you wish to edit. As previously stated, I used to work on wedding photos, so a large portion of my work involved cleaning up acne, blemishes, fixing lighting, cleaning up the background, and removing unsightly appearances on guests and clothing. I may come back to this thread at a later date to include more examples, but I'll go over a few of them below for the sake of the guide.
Additionally, I'll be providing some examples photos that I've worked on specifically for this thread to show how it's done.
Torn clothing
In the example image above, you can see that there's a nasty rip in the pants that's been shoddily "fixed" with a pin. We're going to properly fix it with Photoshop.
The first tool you'll want to use is the clone stamp tool. When using the clone stamp tool, it's important to analyse the surroundings of the area you want to edit. In this case, noting the vertical pattern in the jeans will allow us to make a much cleaner fix. So once you've selected the clone stamp tool, you'll want to select the sample area slightly above your work area and make nice, gentle strokes downward, keeping the pattern of the jeans in mind.
As you can see, this is much better, but this isn't perfect. We want to clean this up a bit more to make it slightly more presentable.
There are lots of ways to go about this, but what I did here was take a sample of the upper-area of the jeans using the selection tool, pasted this into its own layer a few times, and reduced the opacity to about 10%. This remove the unsightly leftovers from the original patchwork.
Acne & Blemishes
A common issue photo editors run into is that when they edit out blemishes, they over-do it and make the face look too airbrushed, resulting in an ugly plastic look.
Ideally, we want to avoid this.
So to start, here's our example image:
We want to get rid of that nasty blemish. Photoshop actually has a tool for this kind of situation called the spot healing tool. Now, this tool works in about 70% of situations. The times it doesn't work are when the blemish is surrounded by odd lighting or a foreign object, in this case a finger. Still, we're going to use the tool to start it off by cleaning up what we can whilst trying not to use the tool too close to the finger.
Better, but eh, not great. You can still see the area where the blemish was, and that's what we want to work on next.
You could use the clone stamp tool for this, but I wanted to work on this one a bit differently to avoid using the same tool over and over again for this guide. So I went with using the dropper tool on the skin nearby the blemish, using the paint brush tool with the hardness turned down on the skin irritation, brushing over the red area in a new transparent layer, turning on overlay, and reducing the opacity to 20%.
Admittedly, this one turned out okay, but I know I could've done it better. Still, you get the point.
Background Issues
Background issues range from simple to complicated. Normally, you're not going to be working on background issues that are really close up like the image below is, so you don't have to put a ton of effort into making it spotless.
In the example image below, we'll be remove an outlet from the wall. Simple, right? Mostly.
I'm going to give in and use the clone stamp tool to remove the outlet since it's the fastest way to do it and I unfortunately can't spend too long writing these guides up (*looks at inbox to see "Sir, why you writing guides and not reviewing my thread? URGENT RESPONSE NEEDED"*).
So it looks okay, but I used to clone stamp tool a little too close to the door trim, resulting in it looking like I placed it there rather than removed the outlet.
Now, if I weren't pressed for time, I would look into a less lazy way of doing this, but what I'm going to do is use the paint brush tool to add some white underneath the door trim to try to lighten up the area near it, the way it looked originally (and no, copy and pasting the old trim doesn't work without requiring us to go and edit that further.).
This is yet another one I'm not happy with, but again, you won't typically be working on a light switch this close up anyway (unless you edit photos for a light switch company).
Photoshop Resource List
There was originally a Photoshop resource list thread here created by a now-banned member, but I decided to re-share it here after removing the outdated links and adding in some relevant ones.Stock Images
As a heads up, in the United States, any photo taken before 1924 belongs to the public domain.
- https://www.shutterstock.com/
- https://www.istockphoto.com/
- https://creativecommons.org/
- https://www.stockvault.net/
- http://www.everystockphoto.com/
- https://materialdesignicons.com/ -Suggested by @Gogol
Filters
Textures
Brushes
Vectors
- https://www.vectordiary.com/
- http://qvectors.net/
- https://www.vecteezy.com/
- https://www.vectorstock.com/
Final Words
Just like my video production guide, this guide won't cover everything as the topic of photo editing is extensive. Some people get started in photo editing doing a variety of different things, and then eventually choose to specialise in one area. Other people fancy themselves as generalists and try to learn it all. What you end up doing will depend entirely on your goals, and there are many more resources out there that you can use to improve your skills.
Last edited by a moderator:


