- Apr 25, 2011
- 19,848
- 28,308
Seeing as I often see people asking how to migrate their website to a new host, here is a step by step guide for doing it manually.
Take a full backup of your website
First step is to take a full backup of your website. If you are using cpanel, you can log in and use the backup feature.
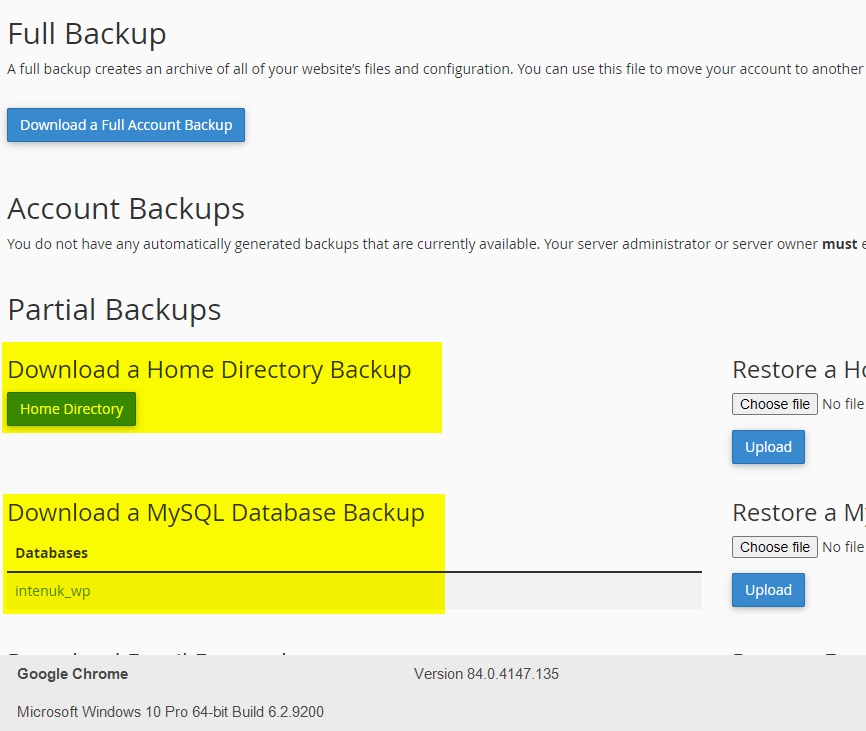
To do this, just go to cpanel - yourdomain.com/cpanel, then click on Backup and then click on "Home directory" to download the files and each database to download databases.
Note; there is also a "full backup" option, but this is a little more complex as it downloads the backup to the root of your hosting account, then you have to download it from there via FTP.
So instead, I use the above method, which downloads the data directly from cpanel to your computer.

Downloading files via FTP
In addition to the above, I also download the website files via FTP. The reason is this; I have seen in the past, with very big sites and long directory paths, sometimes the cpanel backup feature does not actually back up all files successfully. With FTP however, even though its a little slower, you get a full log of all transfered files and you are alerted if any fail.
Note: FTP only downloads the files, for database, we will rely on the backup taken in the previous step.
For download files via FTP, I use Filezilla for Windows. You can download the program here. https://filezilla-project.org/
Once you have downloaded, install it using the default options - just read each screen carefully though as sometimes it also tries to install some bloatware.
Once you have installed filezilla, open it up and add your website details to the site manager.
You just need your website address (Or your FTP host name - sometimes on shared hosting your FTP host address is not the same as your site address).
Your username and your password - these will be provided to you by your host. With cpanel they are the same as your cpanel username and password.
Enter this information into the appropriate boxes and click on connect.

Once you are connected, navigate in to the root folder of your website. Normally this will be inside of public_html folder. Sometimes if you are on shared hosting or you have multiple websites under the same cpanel account you might have a folder for each website in your account, so you need to browse to the correct location for your website.
If you are unsure whether or not you are in the right folder you can confirm this by uploading a text file - for exampe, create a file called test.txt and upload it, then visit your website and make sure you can access it via yourdomain.com/test.txt. That way, you are certain that you are backing up the right files.
On the lefthand panel, navigate to an appropriate location on your local computer - I normally go to my desktop and then create a folder called "website-backup" for example.
Once you have the correct locations set for local and remote, select everything in the righthand panel by pressing ctrl+a then right click on the selection and click on download.
This will download a full copy of your website files to your local computer.

This will be slower, it might also ask occassionally if you want to replace files (This is due to some differences in the way linux and windows handle files and sometimes due to file transfers being restarted) select yes if asked about this.
At the end of this process you may find that some files have failed to download, you will see them in the failed downloads panel at the bottom of filezilla. Once all of the other transfers have finished you can right click on the failed files list and select - "Reset and requeue all". Then go back to the queued files tab, right click and select "process queue".

Now that you have downloaded all of your files, you can upload them to your new host.
Setting up your new host
Set up the domain on your new hosting account, create your cpanel account and get your login details together. Once thats been done, set up the new account in filezilla.
Once again you will need the FTP host and the username and password - typically this will be your cpanel username and password.
As your actual website is still with the old host, you will need to use either the new hosts IP address or the generic host name to put into the host box in filezilla.
Now you can connect to the new host in filezilla and upload all of the files.
Make sure you navigate to the correct location on the new host - typically this will be inside of the public_html folder.
Then, just like when you downloaded the files (but in reverse order) select all of the backed up files in the lefthand panel, right click on the selection and then select "Upload".
Again if you are prompted to replace files then click on OK.
Once everything has finished uploading, check again in the failed transfers tab of filezilla and reset and requeue any files that failed to upload.
Once this process is complete, you have a full copy of your website files on the new host.
The next step is to transfer the database.
Transfering the database
We took a backup of the database from the old host, so on the new host we need to create a new database in which to restore the files.
If you are using cpanel, this is easy - log in to cpanel on the new host and click on MySQL Database Wizard.
Follow the step by step guide in which you will be prompted to create a database and a user account for that database.
You can enter anything for the database name, username and password but if you are using WordPress I tend to use "wp" for the database name and "user" for the user.
Use the automatic password creation option so that you get a nice secure password.
On the last screen - mysql permissions - tick the box labelled "all permissions".


Once the database is created, make a note of the database name, username and password - we will need those shortly.
The next step is to restore the data into the new database.
For this step, go back to your cpanel homepage and click on phpMyAdmin.
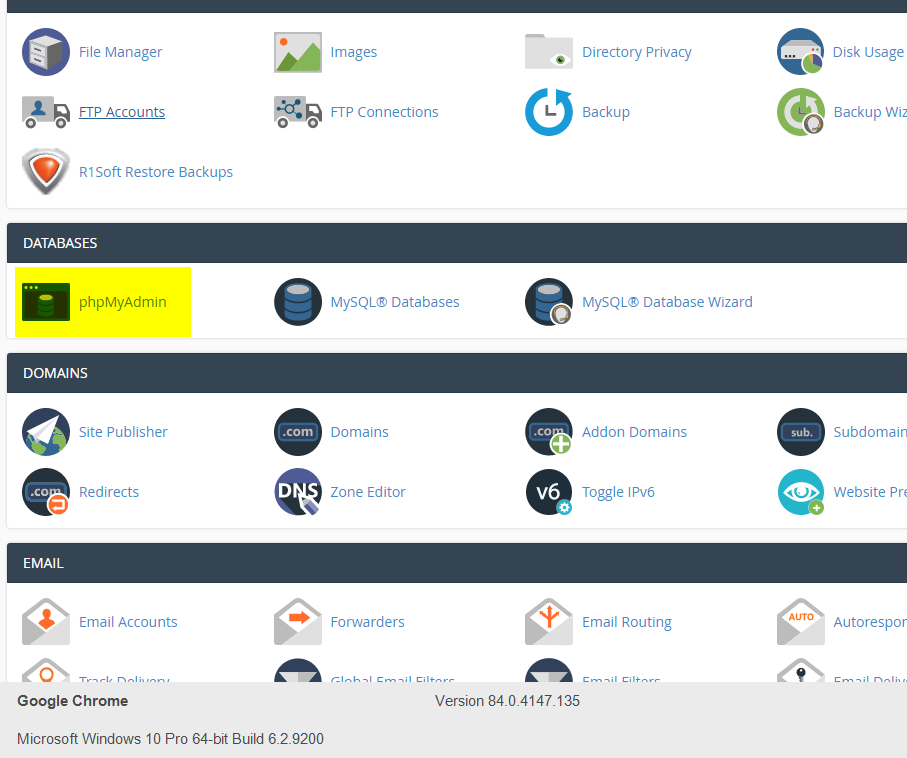
Look for the name of the database that you just created - it should be in the lefthand column of phpMyadmin.
Click on the database, then click on Import, then click on choose file and browse for the location of the database backup that you took in the first step.
Then click on "Go".
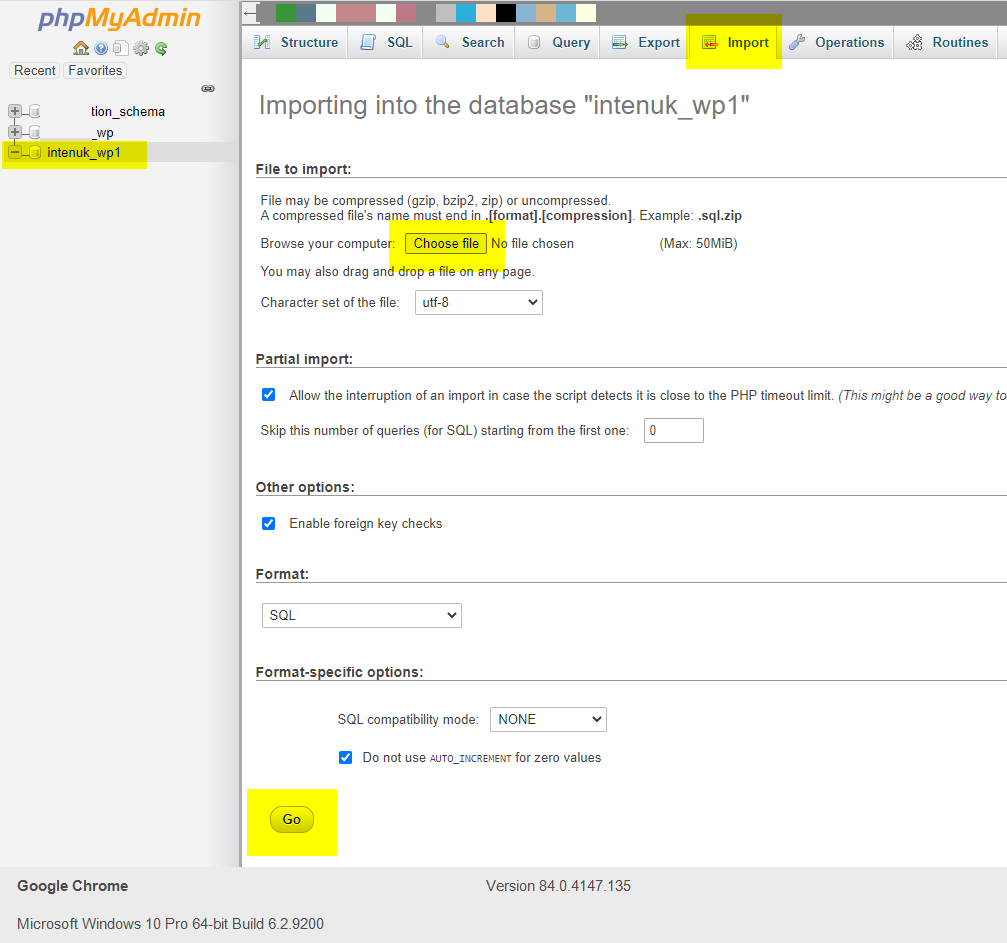
This will import all of the data into the database on your new host.
Now thats done, the last remaining step for migrating the website to the new host is to update your WP-config settings.
Go back to Filezilla and once again connect to the new hosting account.
Browse to the location where you uploaded the files and look for a file in the root directory called wp-config.php.
Right click on this file in the righthand panel of filezilla and click on "download".
Save this file for later - we'll come back to it after we have made a few other changes.
Testing everything before switching to the new hosting
Notice that we haven't actually changed anything related to the domain name or the DNS settings yet, so even though we have transfered a copy of the website, the new host isn't live.
That is because we want to test everything BEFORE we complete the live transfer. That way it avoids that horrible issue where you get everything transfered only to find out something isn't wortking.
Then you have a frantic struggle to get things fixed whilst you know that none of your visitors can actually get on to your website.
Instead of having that panic, we'll test everything prior to switching to the new host.
To do that, we need to trick the computer into thinking that the website HAS been fully transfered to the new hosting provider.
For this, we first need to open up notepad as administrator - to do this, search for notepad in the start menu, right click on it and select "run as administrator".
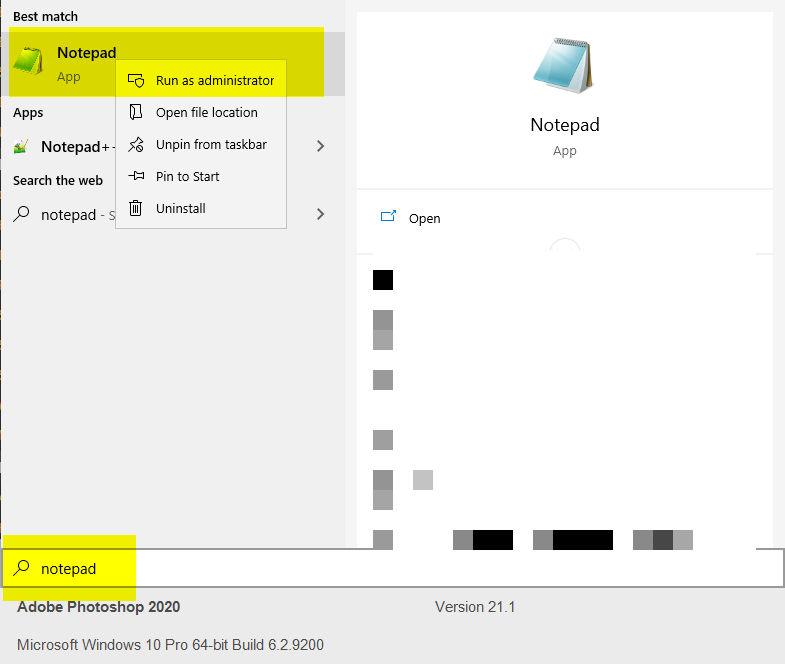
Once in notepad, click on file, open and then browse to this location on your computer -
c:\windows\system32\drivers\etc\
Once you are in that location, open the file named "hosts". This file is hidden by default, so even though that folder looks empty
you can just type in "hosts" into the File name box and click on open and it will open the file.


Once you have this file open, add two entries at the bottom of the file for your website - with and without www.
Replace 1.2.3.4 with the IP address of your new hosting account and website.com with your websites domain name.
After you've added these entries click on file, save and then close notepad.
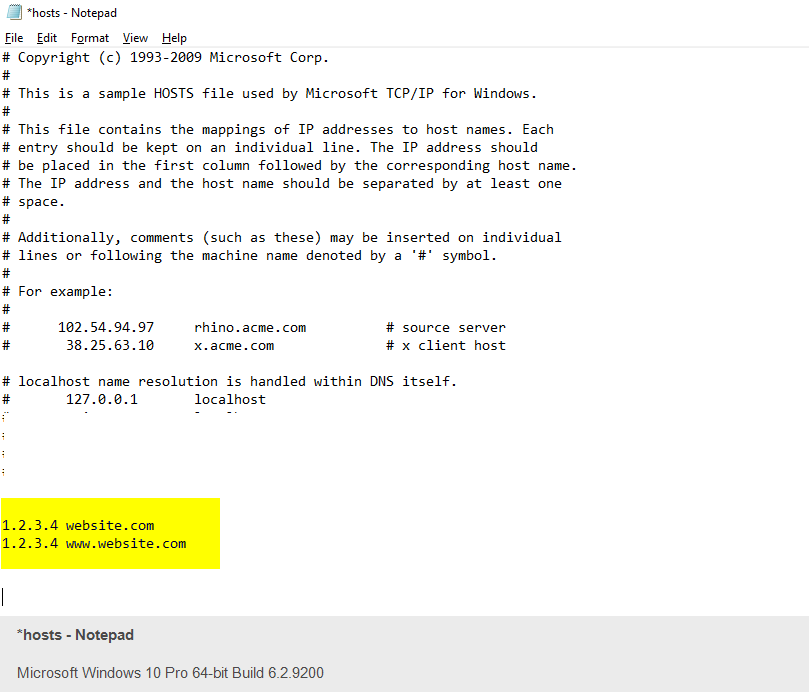
What this does is tells your computer that your website is located on your new hosting account - it basically ignores the real DNS data and uses the data you have inputed.
Close your browser, then re-open it and navigate to your website.
If everything has worked as expected, you should see a database error. Yes thats right, thats because we have not yet configured the files on the new host to point to the new database.
This was intentional as it allows us to confirm we are seeing the website as it is on the new hosting provider.
Now, remember I told you to keep a copy of the wp-config.php file that we downloaded? Lets go back to that file now.
Open it in your prefered text editor (Notepad for example) and find the section that contains the database details.
You will need to replace enter your new database name, username and password in the relevent locations within wp-config.php.
make sure you leave the single quotation marks surrounding each of the details.
You may need to update MySQL hostname as well - normally this will be localhost, but some hosting providers give you an alternative server address for SQL databases.
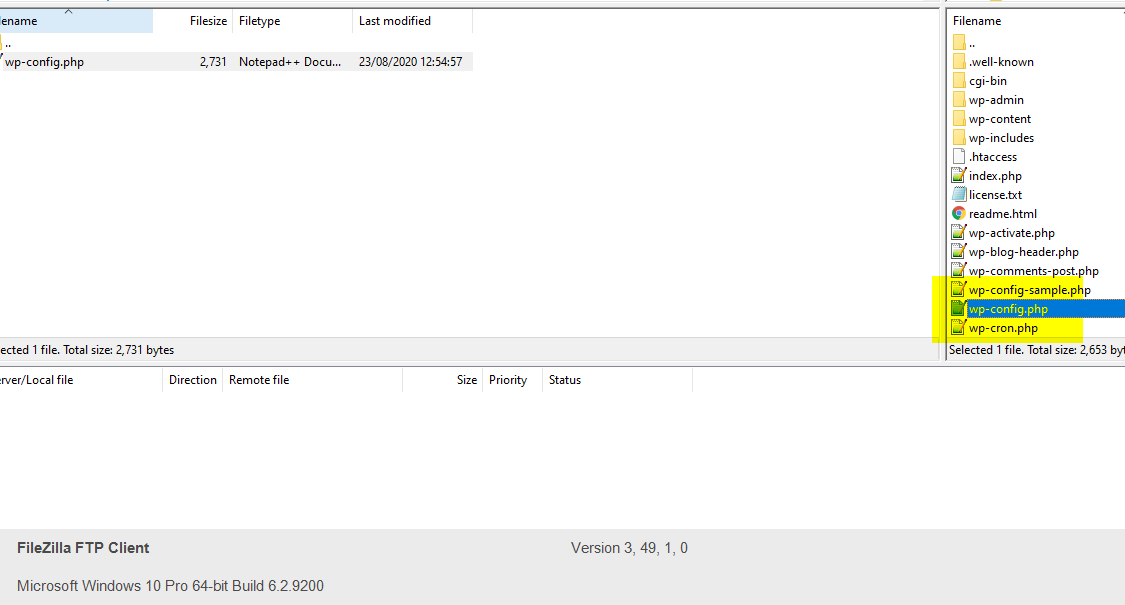

Once you have added in the new details, save this file and then upload it via filezilla - once again, to do this just right click on the wp-config.php file in the lefthand (local) panel of filezilla.
Then click on "Upload". You will be asked if you want to replace the existing file - select yes.
Now, go back to your website and refresh the page - you should now see the website loads correctly.
Check through the website, make sure it works as expected, make sure you can navigate to sub-pages on the website and make sure everything works exactly as it should.
Once you are happy it is working you now know for certain that your website will work on the new host - now we can proceed to the live transfer.
Live transfer
For the website to actually work via the new host we need to update the DNS records for the domain.
For this, you just need to go to your domain registrar (this is the company from whom you purchased the domain) and update the DNS settings.
The easiest way of doing this is to go to DNS nameservers and add in the nameservers provided by your existing host.
This procedure will be different for every different domain registrar so the best thing is to search on Google something like "updating nameservers for GoDaddy".
Once you make this change, it will take up to 24 hours for your website to be moved over to your new host - in reality though, this is often complete within an hour or two.
Updating your SSL certificate
Once the site is transfered, if you are using cpanel then lets encrypt should automatically create a new SSL certificate for you, but if you want to speed up this process you can log in to Cpanel again on the new host.
Click on Lest Encrypt SSL, look for your domain name and click on "Issue" which will force isuance of an SSL certificate for the domain.
Potential Problems
There are a few potential problems with updating your nameservers (and with changing DNS in general). I will go through each one now.
Problem 1: Your domain is actually registered with the existing hosting provider.
In some cases you may have actually registered your domain with the hosting provider that you are moving away from. Of course this means that you need to transfer your domain as well as your actual website.
The best way of doing this, to avoid any downtime for your website, is to first update the nameservers of the domain, via your existing hosting provider, so that they point to your new hosting provider.
Now the website is being served by your new hosting provider.
Then, once this is done, organise the domain transfer itself, to a new registrar - don't use your new provider because its much better to have the domain registration and the hosting split up - because it makes things like transfering your website to a new host much easier.
The process for transfering domain names also varies depending on the host as well as the domain name extension.
However, for .com domains you have a few parts to the transfer process - first of all you need to unlock the domain to enable transfer - you can ask your existing host, or use Google, for details on doing this.
Once the domain is unlocked, you need to get a copy of your authorization code - again this comes from the exsiting registrar.
Next, you need to check the contact details for your domain and in particular make sure you have access to the email address used for the domain admin contact. You will receive a confirmation email to this address so you need to be able to access it. If you cannot then first update the admin contact email, then wait 24 hours before proceeding with the domain transfer.
After that, you can then go to the new registrar and initiate a domain transfer. The new registrar will ask you for your authorization code, then the transfer will be processed.
This can take up to 7 days but during the transfer window the website will not be effected. Most registrars will also keep the same nameservers once the transfer completes - thats why we updated the nameservers first because it means zero downtime for your website even as the domain registration process is completed.
Problem 2: You have other services, such as email, with your existing host
This is something important to note; if you currently have email services with your existing hosting provider then you will likely have email data that you need to transfer along with your domain. In this case, you can either use the cpanel migration process - but this typically needs to be managed directly by the new hosting provider - or you can first take a backup of your emails - you can do this via whatever program you normally use to check your emails, outlook for example, and then proceeding with the website transfer, then re-importing your emails post transfer.
This is beyond the scope of this article as it complicates the transfer process considerably.
Problem 3: The new host will not let you add the domain until you actually update the DNS records
Some hosting providers will not even let you add the domain unless you have actually pointed your nameservers to the new host. In this case you have no choice but to actually update the DNS records and then afterwards set up the new domain, transfer the files and test the website to confirm everything is working. This isn't ideal as it would involve a little downtime, but it can be minimised by planning everything out as much as possible and following this guide carefully.
Problem 4: You are moving to a new (different) domain name
If you are actually changing the domain name of your website as well, this also complicates the process. In this case, the best thing to do is take a full backup before making any changes, then on the existing host, log in to wordpress and update the websites URL in settings, general (Update the domain in wordpress address (URL) and site address (URL) fields and then click on "Save changes".
Then take a fresh backup as per my guide, transfer this backup as normal to the new host and then once you have restored the backup to the new host, wordpress will already been expecting to run via the new domain name.
There may be locations within your site where there were manual references to the old domain name, to resolve this issue you can use a plugin called "Velvet replace". In this plugin you can enter the old domain and the new domain and it will replace any occurances.
Once you have transfered the website you will also need to set up a redirection from the old domain to the new domain - once again this is beyond the scope of this guide, but you can Google this one.
Finishing up
Now you have successfully transfered your website to a new host, you have confirmed everything is working correctly. The only thing left to do is cancel your account with the old host.
Just to be on the safe side though, keep the orinal backups that you took via the old host - I tend to keep these for several months after the transfer, just in case something goes wrong on the new host.
It is also sensible to take a full backup of the site, via the new hosting provider, as soon as you have completed the transafer - this just acts as a further safety net in the form of a full working backup after successful transfer.
Take a full backup of your website
First step is to take a full backup of your website. If you are using cpanel, you can log in and use the backup feature.
To do this, just go to cpanel - yourdomain.com/cpanel, then click on Backup and then click on "Home directory" to download the files and each database to download databases.
Note; there is also a "full backup" option, but this is a little more complex as it downloads the backup to the root of your hosting account, then you have to download it from there via FTP.
So instead, I use the above method, which downloads the data directly from cpanel to your computer.
Downloading files via FTP
In addition to the above, I also download the website files via FTP. The reason is this; I have seen in the past, with very big sites and long directory paths, sometimes the cpanel backup feature does not actually back up all files successfully. With FTP however, even though its a little slower, you get a full log of all transfered files and you are alerted if any fail.
Note: FTP only downloads the files, for database, we will rely on the backup taken in the previous step.
For download files via FTP, I use Filezilla for Windows. You can download the program here. https://filezilla-project.org/
Once you have downloaded, install it using the default options - just read each screen carefully though as sometimes it also tries to install some bloatware.
Once you have installed filezilla, open it up and add your website details to the site manager.
You just need your website address (Or your FTP host name - sometimes on shared hosting your FTP host address is not the same as your site address).
Your username and your password - these will be provided to you by your host. With cpanel they are the same as your cpanel username and password.
Enter this information into the appropriate boxes and click on connect.
Once you are connected, navigate in to the root folder of your website. Normally this will be inside of public_html folder. Sometimes if you are on shared hosting or you have multiple websites under the same cpanel account you might have a folder for each website in your account, so you need to browse to the correct location for your website.
If you are unsure whether or not you are in the right folder you can confirm this by uploading a text file - for exampe, create a file called test.txt and upload it, then visit your website and make sure you can access it via yourdomain.com/test.txt. That way, you are certain that you are backing up the right files.
On the lefthand panel, navigate to an appropriate location on your local computer - I normally go to my desktop and then create a folder called "website-backup" for example.
Once you have the correct locations set for local and remote, select everything in the righthand panel by pressing ctrl+a then right click on the selection and click on download.
This will download a full copy of your website files to your local computer.
This will be slower, it might also ask occassionally if you want to replace files (This is due to some differences in the way linux and windows handle files and sometimes due to file transfers being restarted) select yes if asked about this.
At the end of this process you may find that some files have failed to download, you will see them in the failed downloads panel at the bottom of filezilla. Once all of the other transfers have finished you can right click on the failed files list and select - "Reset and requeue all". Then go back to the queued files tab, right click and select "process queue".
Now that you have downloaded all of your files, you can upload them to your new host.
Setting up your new host
Set up the domain on your new hosting account, create your cpanel account and get your login details together. Once thats been done, set up the new account in filezilla.
Once again you will need the FTP host and the username and password - typically this will be your cpanel username and password.
As your actual website is still with the old host, you will need to use either the new hosts IP address or the generic host name to put into the host box in filezilla.
Now you can connect to the new host in filezilla and upload all of the files.
Make sure you navigate to the correct location on the new host - typically this will be inside of the public_html folder.
Then, just like when you downloaded the files (but in reverse order) select all of the backed up files in the lefthand panel, right click on the selection and then select "Upload".
Again if you are prompted to replace files then click on OK.
Once everything has finished uploading, check again in the failed transfers tab of filezilla and reset and requeue any files that failed to upload.
Once this process is complete, you have a full copy of your website files on the new host.
The next step is to transfer the database.
Transfering the database
We took a backup of the database from the old host, so on the new host we need to create a new database in which to restore the files.
If you are using cpanel, this is easy - log in to cpanel on the new host and click on MySQL Database Wizard.
Follow the step by step guide in which you will be prompted to create a database and a user account for that database.
You can enter anything for the database name, username and password but if you are using WordPress I tend to use "wp" for the database name and "user" for the user.
Use the automatic password creation option so that you get a nice secure password.
On the last screen - mysql permissions - tick the box labelled "all permissions".
Once the database is created, make a note of the database name, username and password - we will need those shortly.
The next step is to restore the data into the new database.
For this step, go back to your cpanel homepage and click on phpMyAdmin.
Look for the name of the database that you just created - it should be in the lefthand column of phpMyadmin.
Click on the database, then click on Import, then click on choose file and browse for the location of the database backup that you took in the first step.
Then click on "Go".
This will import all of the data into the database on your new host.
Now thats done, the last remaining step for migrating the website to the new host is to update your WP-config settings.
Go back to Filezilla and once again connect to the new hosting account.
Browse to the location where you uploaded the files and look for a file in the root directory called wp-config.php.
Right click on this file in the righthand panel of filezilla and click on "download".
Save this file for later - we'll come back to it after we have made a few other changes.
Testing everything before switching to the new hosting
Notice that we haven't actually changed anything related to the domain name or the DNS settings yet, so even though we have transfered a copy of the website, the new host isn't live.
That is because we want to test everything BEFORE we complete the live transfer. That way it avoids that horrible issue where you get everything transfered only to find out something isn't wortking.
Then you have a frantic struggle to get things fixed whilst you know that none of your visitors can actually get on to your website.
Instead of having that panic, we'll test everything prior to switching to the new host.
To do that, we need to trick the computer into thinking that the website HAS been fully transfered to the new hosting provider.
For this, we first need to open up notepad as administrator - to do this, search for notepad in the start menu, right click on it and select "run as administrator".
Once in notepad, click on file, open and then browse to this location on your computer -
c:\windows\system32\drivers\etc\
Once you are in that location, open the file named "hosts". This file is hidden by default, so even though that folder looks empty
you can just type in "hosts" into the File name box and click on open and it will open the file.
Once you have this file open, add two entries at the bottom of the file for your website - with and without www.
Replace 1.2.3.4 with the IP address of your new hosting account and website.com with your websites domain name.
After you've added these entries click on file, save and then close notepad.
What this does is tells your computer that your website is located on your new hosting account - it basically ignores the real DNS data and uses the data you have inputed.
Close your browser, then re-open it and navigate to your website.
If everything has worked as expected, you should see a database error. Yes thats right, thats because we have not yet configured the files on the new host to point to the new database.
This was intentional as it allows us to confirm we are seeing the website as it is on the new hosting provider.
Now, remember I told you to keep a copy of the wp-config.php file that we downloaded? Lets go back to that file now.
Open it in your prefered text editor (Notepad for example) and find the section that contains the database details.
You will need to replace enter your new database name, username and password in the relevent locations within wp-config.php.
make sure you leave the single quotation marks surrounding each of the details.
You may need to update MySQL hostname as well - normally this will be localhost, but some hosting providers give you an alternative server address for SQL databases.
Once you have added in the new details, save this file and then upload it via filezilla - once again, to do this just right click on the wp-config.php file in the lefthand (local) panel of filezilla.
Then click on "Upload". You will be asked if you want to replace the existing file - select yes.
Now, go back to your website and refresh the page - you should now see the website loads correctly.
Check through the website, make sure it works as expected, make sure you can navigate to sub-pages on the website and make sure everything works exactly as it should.
Once you are happy it is working you now know for certain that your website will work on the new host - now we can proceed to the live transfer.
Live transfer
For the website to actually work via the new host we need to update the DNS records for the domain.
For this, you just need to go to your domain registrar (this is the company from whom you purchased the domain) and update the DNS settings.
The easiest way of doing this is to go to DNS nameservers and add in the nameservers provided by your existing host.
This procedure will be different for every different domain registrar so the best thing is to search on Google something like "updating nameservers for GoDaddy".
Once you make this change, it will take up to 24 hours for your website to be moved over to your new host - in reality though, this is often complete within an hour or two.
Updating your SSL certificate
Once the site is transfered, if you are using cpanel then lets encrypt should automatically create a new SSL certificate for you, but if you want to speed up this process you can log in to Cpanel again on the new host.
Click on Lest Encrypt SSL, look for your domain name and click on "Issue" which will force isuance of an SSL certificate for the domain.
Potential Problems
There are a few potential problems with updating your nameservers (and with changing DNS in general). I will go through each one now.
Problem 1: Your domain is actually registered with the existing hosting provider.
In some cases you may have actually registered your domain with the hosting provider that you are moving away from. Of course this means that you need to transfer your domain as well as your actual website.
The best way of doing this, to avoid any downtime for your website, is to first update the nameservers of the domain, via your existing hosting provider, so that they point to your new hosting provider.
Now the website is being served by your new hosting provider.
Then, once this is done, organise the domain transfer itself, to a new registrar - don't use your new provider because its much better to have the domain registration and the hosting split up - because it makes things like transfering your website to a new host much easier.
The process for transfering domain names also varies depending on the host as well as the domain name extension.
However, for .com domains you have a few parts to the transfer process - first of all you need to unlock the domain to enable transfer - you can ask your existing host, or use Google, for details on doing this.
Once the domain is unlocked, you need to get a copy of your authorization code - again this comes from the exsiting registrar.
Next, you need to check the contact details for your domain and in particular make sure you have access to the email address used for the domain admin contact. You will receive a confirmation email to this address so you need to be able to access it. If you cannot then first update the admin contact email, then wait 24 hours before proceeding with the domain transfer.
After that, you can then go to the new registrar and initiate a domain transfer. The new registrar will ask you for your authorization code, then the transfer will be processed.
This can take up to 7 days but during the transfer window the website will not be effected. Most registrars will also keep the same nameservers once the transfer completes - thats why we updated the nameservers first because it means zero downtime for your website even as the domain registration process is completed.
Problem 2: You have other services, such as email, with your existing host
This is something important to note; if you currently have email services with your existing hosting provider then you will likely have email data that you need to transfer along with your domain. In this case, you can either use the cpanel migration process - but this typically needs to be managed directly by the new hosting provider - or you can first take a backup of your emails - you can do this via whatever program you normally use to check your emails, outlook for example, and then proceeding with the website transfer, then re-importing your emails post transfer.
This is beyond the scope of this article as it complicates the transfer process considerably.
Problem 3: The new host will not let you add the domain until you actually update the DNS records
Some hosting providers will not even let you add the domain unless you have actually pointed your nameservers to the new host. In this case you have no choice but to actually update the DNS records and then afterwards set up the new domain, transfer the files and test the website to confirm everything is working. This isn't ideal as it would involve a little downtime, but it can be minimised by planning everything out as much as possible and following this guide carefully.
Problem 4: You are moving to a new (different) domain name
If you are actually changing the domain name of your website as well, this also complicates the process. In this case, the best thing to do is take a full backup before making any changes, then on the existing host, log in to wordpress and update the websites URL in settings, general (Update the domain in wordpress address (URL) and site address (URL) fields and then click on "Save changes".
Then take a fresh backup as per my guide, transfer this backup as normal to the new host and then once you have restored the backup to the new host, wordpress will already been expecting to run via the new domain name.
There may be locations within your site where there were manual references to the old domain name, to resolve this issue you can use a plugin called "Velvet replace". In this plugin you can enter the old domain and the new domain and it will replace any occurances.
Once you have transfered the website you will also need to set up a redirection from the old domain to the new domain - once again this is beyond the scope of this guide, but you can Google this one.
Finishing up
Now you have successfully transfered your website to a new host, you have confirmed everything is working correctly. The only thing left to do is cancel your account with the old host.
Just to be on the safe side though, keep the orinal backups that you took via the old host - I tend to keep these for several months after the transfer, just in case something goes wrong on the new host.
It is also sensible to take a full backup of the site, via the new hosting provider, as soon as you have completed the transafer - this just acts as a further safety net in the form of a full working backup after successful transfer.