

murdock477
Junior Member
- Aug 22, 2016
- 146
- 77
Thought I'll make this little guide as my first big post, i hope it's helpful for people who have similar needs. Since I started running multiple whitehat accounts I got really annoyed by posting from a bot or having to log in from your mobile all the time. Then I came up with this simple way of managing multiple accounts. If you have proxies with IP authentication then you can easily use this method. if not, skip to
the Bit harder way
1) Go download a Memu Emulator from http://www.memuplay.com/
2) After installing it, search for multi memu in your PC and open it
3) Create a Default Android 5.1 instance and launch it
4) Now we can do the initial configuration: Go download the latest Instagram APK from https://www.apkmirror.com/?post_type=app_release&searchtype=apk&s=instagram
Make sure it's x86 and noDPI version or it will most likely crash or just show white screen. If you downloaded through the Memu, then just install it, but if you downloaded through the computer, just drag the APK file to your opened memu instance and it will install.
Next step is downloading Xposed and Phone ID changer. Get them from here: https://forum.xda-developers.com/showthread.php?t=3034811 & http://repo.xposed.info/module/com.phoneinfo.changer and install them too.
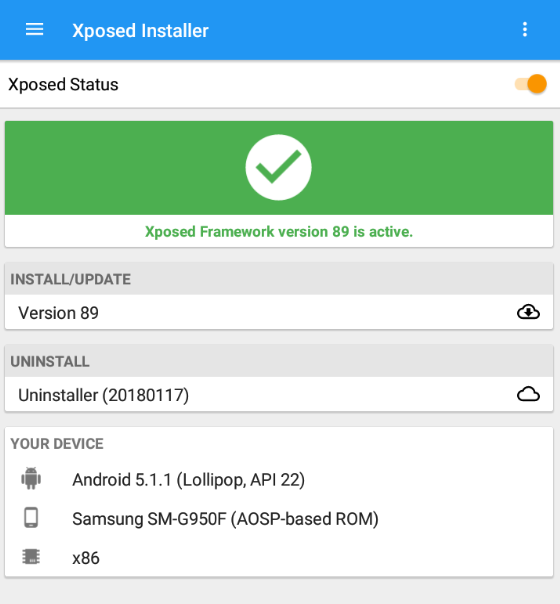
After that, open xposed app and click "Install/Update".
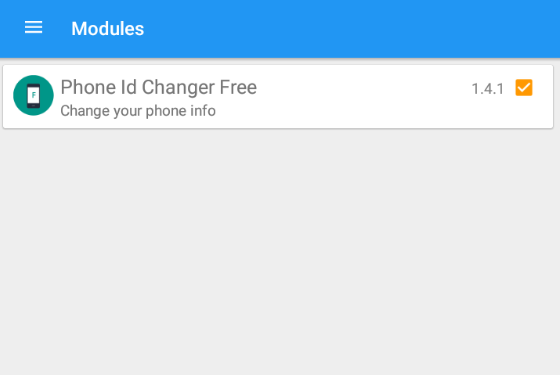
Now go to modules and activate phone ID changer. It's already activated on the pic since I am too lazy to redo the whole process right now
Now do a quick reboot and check if xposed is activated, Instagram APP works and phone ID changer works. If you're good then shut the instance down.
5) Clone more instances, do that by selecting the one you just configured and clone it in Multi-Memu:

6) Now start setting each instance up, one by one. Each instance needs different phone ids so start one up and open up Phone ID changer. Sometimes xposed needed reinstalling after cloning, just do it and then come back to the phone id changer. On the phone id changer click "random all" and then "apply". Restart and now its time to set up the proxy.
7) Open android settings inside the memu and navigate to wifi. Long click on the wifi network opens up a popup and then click "modify network". Check advanced options and select manual proxy. Then, just fill in your IP and Port.

Click save and you're done. Open up a random IP check website and see if your IP matches the proxy.
8) Now open your IG app and log in to your accounts.
9) repeat steps from 6-8 with each new instance you create. Later you can just run them separately and handle the accounts like you're on your phone.
At first I thought IG would bypass the wifi proxy, but I've made multiple tests and it seems Memu Proxy settings are global. Going to a IPleak.net on IG browser gave me the correct IP too. I myself am running all my accounts fine.
Bit harder way:
1) Get Proxifier: https://www.proxifier.com/
2) Install it and open up "Proxy servers" from "Profile" dropdown. Click add and configure your proxy.
3) Then proceed to "Proxification Rules" and click "Add". Name the rule after your proxy IP and into the "Applications" box enter "memu*.exe". This will proxify every memu related process. At the bottom you see action dropdown, choose the proxy you want and click "Ok".

4) Now whenever you want to activate any of your proxies just click the checkmark for the choosen proxy Rule in the proxy rules list and then "ok". The downside is you can run only one memu instance at once.
I hope this is helpful and I made no mistakes. This is currently the best way to manage accounts right now, in my opinion
the Bit harder way
1) Go download a Memu Emulator from http://www.memuplay.com/
2) After installing it, search for multi memu in your PC and open it
3) Create a Default Android 5.1 instance and launch it
4) Now we can do the initial configuration: Go download the latest Instagram APK from https://www.apkmirror.com/?post_type=app_release&searchtype=apk&s=instagram
Make sure it's x86 and noDPI version or it will most likely crash or just show white screen. If you downloaded through the Memu, then just install it, but if you downloaded through the computer, just drag the APK file to your opened memu instance and it will install.
Next step is downloading Xposed and Phone ID changer. Get them from here: https://forum.xda-developers.com/showthread.php?t=3034811 & http://repo.xposed.info/module/com.phoneinfo.changer and install them too.
After that, open xposed app and click "Install/Update".
Now go to modules and activate phone ID changer. It's already activated on the pic since I am too lazy to redo the whole process right now
Now do a quick reboot and check if xposed is activated, Instagram APP works and phone ID changer works. If you're good then shut the instance down.
5) Clone more instances, do that by selecting the one you just configured and clone it in Multi-Memu:
6) Now start setting each instance up, one by one. Each instance needs different phone ids so start one up and open up Phone ID changer. Sometimes xposed needed reinstalling after cloning, just do it and then come back to the phone id changer. On the phone id changer click "random all" and then "apply". Restart and now its time to set up the proxy.
7) Open android settings inside the memu and navigate to wifi. Long click on the wifi network opens up a popup and then click "modify network". Check advanced options and select manual proxy. Then, just fill in your IP and Port.
Click save and you're done. Open up a random IP check website and see if your IP matches the proxy.
8) Now open your IG app and log in to your accounts.
9) repeat steps from 6-8 with each new instance you create. Later you can just run them separately and handle the accounts like you're on your phone.
At first I thought IG would bypass the wifi proxy, but I've made multiple tests and it seems Memu Proxy settings are global. Going to a IPleak.net on IG browser gave me the correct IP too. I myself am running all my accounts fine.
Bit harder way:
1) Get Proxifier: https://www.proxifier.com/
2) Install it and open up "Proxy servers" from "Profile" dropdown. Click add and configure your proxy.
3) Then proceed to "Proxification Rules" and click "Add". Name the rule after your proxy IP and into the "Applications" box enter "memu*.exe". This will proxify every memu related process. At the bottom you see action dropdown, choose the proxy you want and click "Ok".
4) Now whenever you want to activate any of your proxies just click the checkmark for the choosen proxy Rule in the proxy rules list and then "ok". The downside is you can run only one memu instance at once.
I hope this is helpful and I made no mistakes. This is currently the best way to manage accounts right now, in my opinion


