
Hi All,
This idea has been bouncing around my head for a while, and I had created a guide before but have finally decided to make a full start to finish guide for all those who are new to how VPSs work.
If you are currently paying through the nose for multiple shared hosting servers, or want to understand more about VPS Servers, than this guide is for you.
Moving away from Shared Hosting is always a good decision. Here is how to setup a VPS and set everything up to get your website online. I personally moved away from shared hosting (Dreamhost) in 2007 to VPS's, and have never looked back.
So would should you move away from Shared Hosting?
You should move away from Shared Hosting when your site has overcome the initial stage and you require too many resources for your server, or if your hosting provider isn't very good - many shared hosts "oversell" which means that you have thousands of users per server each having their website.
This is bad for your site in terms of SEO (as Google usually considers shared IP Addresses to be a*bad thing) and in terms of speed - with many users on the same machine your performance usually takes a nose dive.
If your blog is getting a large influx of visitors, or your provider is complaining that your script is taking up too many resources, this is also a key that you should move to a VPS.
But how much will this cost me?
The VPS price range is quite reasonable, with providers such as Linode, Slicehost, Rackspace etc all have good entry level plans to get you started.
Alternatively you can also get a "cloud" server which is pretty much exactly the same as a VPS from a company such as Amazon EC2, or from Rackspace (I love Rackspace!).
You can expect to pay between $10-20 a month for a VPS. Burstnet currently has a deal for a $5 a month VPS, which may be a good alternative for you as well. Beware low cost VPSs as these usually perform horribly and not worth the cost.
So how do I get started?
Usually you just need to sign up for a VPS, and they usually email you your SSH details. SSH is a method that you use to connect to the server securely and set things up. You use a program called PuTTY, which is a program that lets you remotely connect to Linux servers from Windows. Using a Mac or a Linux computer - you can just open up terminal and type in "ssh myserver.com" .
For this example, I am using a Rackspace 512MB "Cloud Server" which is just a current fad marketing term for a VPS. You can however use any host you like. This is $21 a month. I'm also going to be using Ubuntu 10.04 which is the current Ubuntu LTS which means it will be supported until April 2015.
What will we be installing?
This will get you the following:
nginx 1.0.x - The webserver.
Varnish 3.x - The reverse proxy.
MySQL 5.x - The database server.
PHP 5.3.x
Memcached
APC
NGINX - NGINX is a very powerful webserver. You may have heard of Apache2 before, but I've found that NGINX handles load better than Apache2. Powering over 40 million domains, powering companies such as Facebook, Zappos, Groupon, LivingSocial, Hulu, TechCrunch, Dropbox and WordPress, it's quite a nice piece of software.
MySQL - MySQL is a database server, powering many powerful websites. This runs as a database for pretty much all opensource PHP code and is quite a nice database that scales fairly well.
PHP - PHP is the program that runs Wordpress, Drupal, Joomla etc.
APC - APC which is a op-code cache that drastically improves PHP performance. This is neccessary as it really does speed up frequently ran PHP code!
Memcached - Memcached is a Key-value data cache which allows many PHP CMS's/CMF's to cache it's commonly accessed data to lower database load - meaning that your Wordpress/Drupal/Joomla site will now FLY. This is one of the biggest improvements you can do to your site if your site is database-driven.
This will then be used like the following:
Varnish (port80) --> nginx (port81) -> website
Alternatively you can also setup Cloudflare instead of Varnish, however I usually use both on my sites (depending on the traffic).
Step 0: Getting a good VPS
This is the step where most people stumble. Sure there is a ton of VPS providers out there, however most of them are resellers. You can usually find a good deal on here (BHW), or find coupons and special offers from other forums who focus on Web Hosting.
I personally use Rackspace(affiliate link), and have had no issues with them for months. I run multiple cloud servers off them, and have no issues with downtime (except scheduled maintenance which usually lasts 30 minutes, however this is rare).
You can sign up here , which I would appreciate if you do as this earns me a couple of dollars.
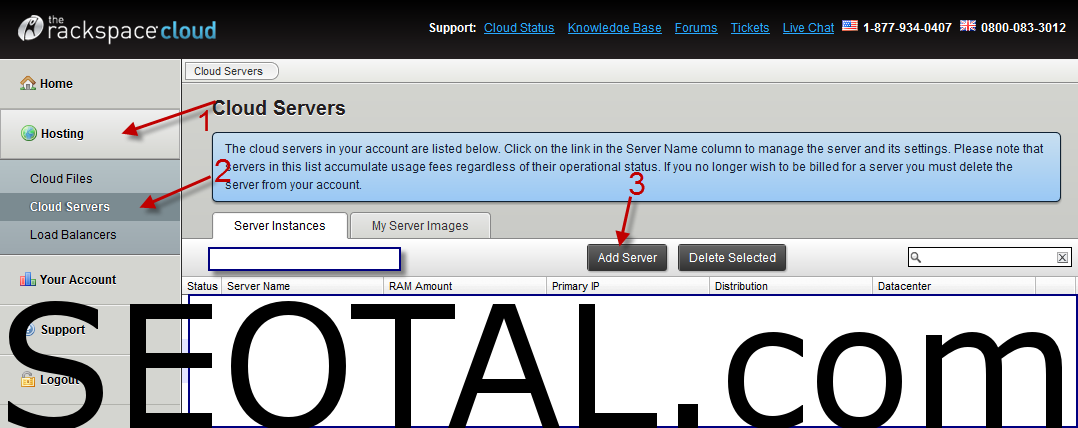
Now, when this is setup, you'll be able to login to the Management Console here, then Hosting -> Cloud Servers, then Add Server.
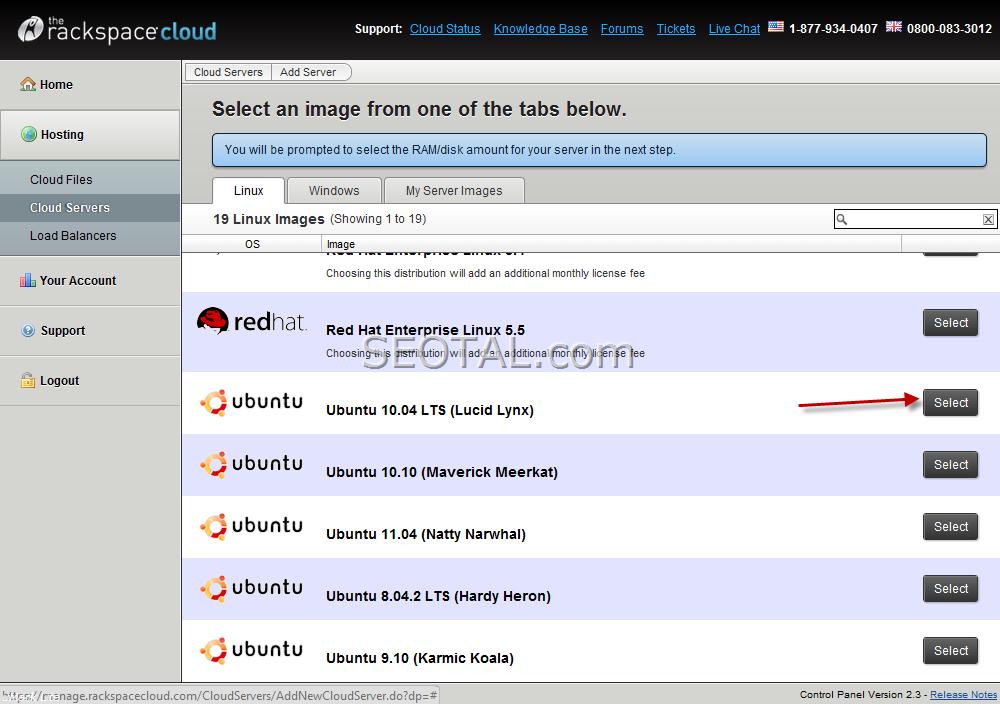
A box with show, you will now need to select which Operating System/Distro you want to run. I highly recommend choosing Ubuntu 10.04, as this is very stable and will be supported with updates until April 2015.
Now you need to select the size of the server, as well as the nickname for it. I run mine off 512MB with costs $22 a month.

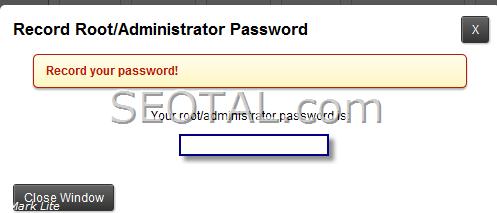
This will then go and create the server for you, and give you the root password for the server.
This will take one or two minutes for the server to become Active.
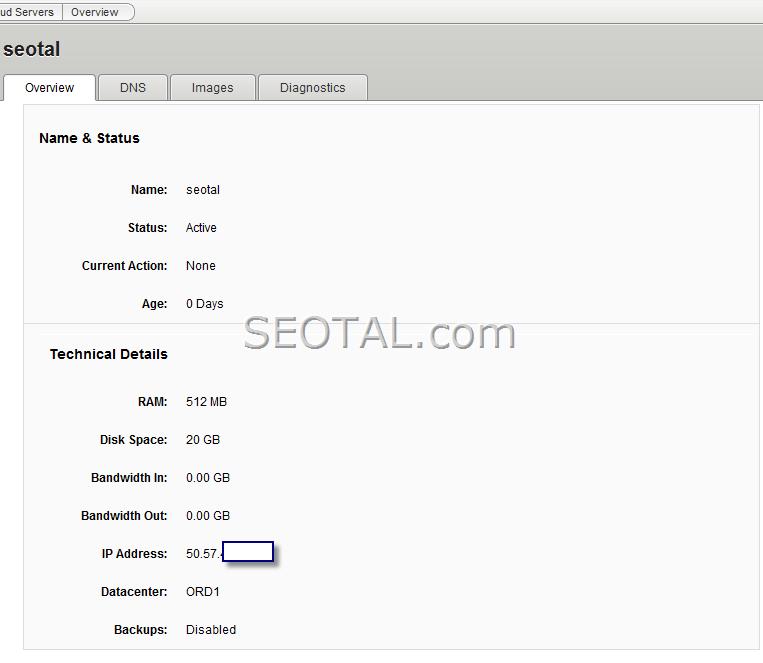
The next screen shows you the overview of the server, which supplies you with the IP Address and other handy information. Most of this can be ignored, but keep a note of the IP Address.
Congratulations! You now have a basic VPS setup with Rackspace and can move onto the next steps!
Step 1: SSH
After your server is provisioned with your hosting company, you should be given an IP Address, and a username and password to connect to this server. Usually the username is root, however this could also be a normal user account.
First, you will need to download a program called PuTTY to connect to your server, which you can find at http://www.chiark.greenend.org.uk/~sgtatham/putty/download.html.
If you are using Mac or Linux, you can just connect using Terminal, with:
Now, run this and the following window should appear:
You will need to type in the IP Address given to you by your provider, and then press enter.
A window will then appear, which you will need to type in your username and password. Please note that the password will not show anything as a security feature.
Now, you should see the following window. As you can see, my server is running Ubuntu 10.04. You can see that it's named testing. If your server is not 10.04 LTS or newer (10.10 or 11.04), I highly recommend asking your host to upgrade.
Step 2: Updating and upgrading the base system.
Now, it's a good idea to update and upgrade our system to the latest version before we do anything. So, type in the following:
apt-get update
At the end, it should say:
Now we should upgrade our packages. This can be done by typing:
And then type y when it asks us if we would like to upgrade our system.
Now, I usually reboot at this stage as this is generally the last reboot I make for many months. This can be done by typing:
Wait a moment and reconnect to your server as you did before.
Step 3: Installing everything.
I have a fork of a script created by VladGH, which installs everything you need to get running. My script also installs Varnish (a caching server), which is highly recommended if you are going to be hosting a large number of static sites, as well as Wordpress.
To get this to run, simply type:
Now, you need to clone the current branch of the git repository, which you can do by:
This will run through the installation steps for you, which is pretty easy. This may take some time depending on the internet speed, size of the server etc. This usually takes me 30 minutes on a Rackspace cloud server.
After this has been completed, you will need to start getting your sites setup and working.
By default, this will work fine. You will might want to tweak nginx or Varnish, however I've been running off this setup for a while and it works fine.
So now if you access http://yourhostip you should be able to see the PHP info page - this tells you that:
1) NGINX was installed.
2) PHP was installed.
3) You can check for APC/Memcached/MySQL as well.
If all works fine, you can remove these files.
Step 4: Website Configuration
Now let's say that you have 3 websites:
- example.com
- subdomain.example.com
- third.example.com
You can have as many domains/subdomains with NGINX, but I'll just be focusing on these three as an example. Change these to your domain(s) as you go.
Now you need to change directory to the nginx configuration folder, this can be done via:
Now, we want to remove the default configuration file that the script puts in here, and start adding a file for each domain.
A technique that I do is running Wordpress Multisite which allows me to run as many Wordpress sites that I need off one installation, as well keeping the code uniform across this site. A best practices guide for this is coming soon.
Let's just assume that we want a different Wordpress setup for each domain.
So let's remove the default file:
Now, you can copy the below text and put in your own domain name, as well as the location. I recommend having a folder for each domain under /var/www/my-domain , this keeps everything tidy and in one standard location.
So, let's use nano to create the configuration for example.com with Wordpress.
Now, copy in the following, and change the details to match your site configuration:
Before setting up Wordpress, let's setup PHPMyAdmin. PHPMyAdmin is a PHP application to manage your MySQL databases. You can find more information on its official site.
Let's get it setup and running!
I usually run PHPMyAdmin on a different port than 80, or run it through a subdomain (such as phpmyadmin.example.com). For this example I'll be running it through port 82.
Now we need to configure nginx for phpmyadmin.
Paste in the following:
Now, restart nginx (and varnish if you used a subdomain):
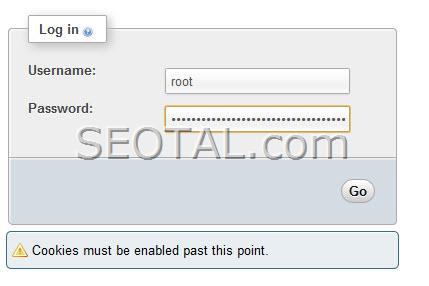
Now, go to http://myip:82 (or your subdomain), and it should bring up Phpmyadmin. Use the details from before to login:
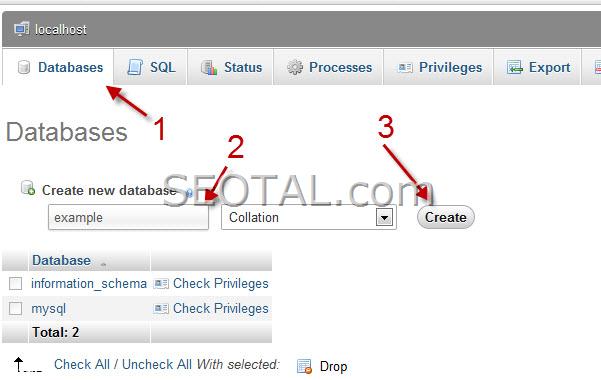
Now, click Databases, then choose the database name, then click create. Make sure you remember this database, as this will be the one we are going to use with your CMS.
Now, let's setup Wordpress under the folder:
Now go through this file and fill in the database name (example), user (root), and the database password. Press ctrl+o to save, then enter then press ctrl+x to quit.
Now, we need to restart nginx and varnish, and install Wordpress.
Now, go to your domain (http://example.com/wp-admin/install.php) and see if the Wordpress installation shows.
Now, go through the Wordpress installation using your details from before.
Afterwards, it's a good practice to change wp-config.php permissions back:
All done! From here, you can either install a FTP server, or you can edit your files using a program such as WinSCP, which I highly recommend.
If you have any additional questions, please feel free to leave a reply here or send me a PM and I'll help you out.
This idea has been bouncing around my head for a while, and I had created a guide before but have finally decided to make a full start to finish guide for all those who are new to how VPSs work.
If you are currently paying through the nose for multiple shared hosting servers, or want to understand more about VPS Servers, than this guide is for you.
Moving away from Shared Hosting is always a good decision. Here is how to setup a VPS and set everything up to get your website online. I personally moved away from shared hosting (Dreamhost) in 2007 to VPS's, and have never looked back.
So would should you move away from Shared Hosting?
You should move away from Shared Hosting when your site has overcome the initial stage and you require too many resources for your server, or if your hosting provider isn't very good - many shared hosts "oversell" which means that you have thousands of users per server each having their website.
This is bad for your site in terms of SEO (as Google usually considers shared IP Addresses to be a*bad thing) and in terms of speed - with many users on the same machine your performance usually takes a nose dive.
If your blog is getting a large influx of visitors, or your provider is complaining that your script is taking up too many resources, this is also a key that you should move to a VPS.
But how much will this cost me?
The VPS price range is quite reasonable, with providers such as Linode, Slicehost, Rackspace etc all have good entry level plans to get you started.
Alternatively you can also get a "cloud" server which is pretty much exactly the same as a VPS from a company such as Amazon EC2, or from Rackspace (I love Rackspace!).
You can expect to pay between $10-20 a month for a VPS. Burstnet currently has a deal for a $5 a month VPS, which may be a good alternative for you as well. Beware low cost VPSs as these usually perform horribly and not worth the cost.
So how do I get started?
Usually you just need to sign up for a VPS, and they usually email you your SSH details. SSH is a method that you use to connect to the server securely and set things up. You use a program called PuTTY, which is a program that lets you remotely connect to Linux servers from Windows. Using a Mac or a Linux computer - you can just open up terminal and type in "ssh myserver.com" .
For this example, I am using a Rackspace 512MB "Cloud Server" which is just a current fad marketing term for a VPS. You can however use any host you like. This is $21 a month. I'm also going to be using Ubuntu 10.04 which is the current Ubuntu LTS which means it will be supported until April 2015.
What will we be installing?
This will get you the following:
nginx 1.0.x - The webserver.
Varnish 3.x - The reverse proxy.
MySQL 5.x - The database server.
PHP 5.3.x
Memcached
APC
NGINX - NGINX is a very powerful webserver. You may have heard of Apache2 before, but I've found that NGINX handles load better than Apache2. Powering over 40 million domains, powering companies such as Facebook, Zappos, Groupon, LivingSocial, Hulu, TechCrunch, Dropbox and WordPress, it's quite a nice piece of software.
MySQL - MySQL is a database server, powering many powerful websites. This runs as a database for pretty much all opensource PHP code and is quite a nice database that scales fairly well.
PHP - PHP is the program that runs Wordpress, Drupal, Joomla etc.
APC - APC which is a op-code cache that drastically improves PHP performance. This is neccessary as it really does speed up frequently ran PHP code!
Memcached - Memcached is a Key-value data cache which allows many PHP CMS's/CMF's to cache it's commonly accessed data to lower database load - meaning that your Wordpress/Drupal/Joomla site will now FLY. This is one of the biggest improvements you can do to your site if your site is database-driven.
This will then be used like the following:
Varnish (port80) --> nginx (port81) -> website
Alternatively you can also setup Cloudflare instead of Varnish, however I usually use both on my sites (depending on the traffic).
Step 0: Getting a good VPS
This is the step where most people stumble. Sure there is a ton of VPS providers out there, however most of them are resellers. You can usually find a good deal on here (BHW), or find coupons and special offers from other forums who focus on Web Hosting.
I personally use Rackspace(affiliate link), and have had no issues with them for months. I run multiple cloud servers off them, and have no issues with downtime (except scheduled maintenance which usually lasts 30 minutes, however this is rare).
You can sign up here , which I would appreciate if you do as this earns me a couple of dollars.
Now, when this is setup, you'll be able to login to the Management Console here, then Hosting -> Cloud Servers, then Add Server.
A box with show, you will now need to select which Operating System/Distro you want to run. I highly recommend choosing Ubuntu 10.04, as this is very stable and will be supported with updates until April 2015.
Now you need to select the size of the server, as well as the nickname for it. I run mine off 512MB with costs $22 a month.
This will then go and create the server for you, and give you the root password for the server.
This will take one or two minutes for the server to become Active.
The next screen shows you the overview of the server, which supplies you with the IP Address and other handy information. Most of this can be ignored, but keep a note of the IP Address.
Congratulations! You now have a basic VPS setup with Rackspace and can move onto the next steps!
Step 1: SSH
After your server is provisioned with your hosting company, you should be given an IP Address, and a username and password to connect to this server. Usually the username is root, however this could also be a normal user account.
First, you will need to download a program called PuTTY to connect to your server, which you can find at http://www.chiark.greenend.org.uk/~sgtatham/putty/download.html.
If you are using Mac or Linux, you can just connect using Terminal, with:
Code:
You will need to type in the IP Address given to you by your provider, and then press enter.
A window will then appear, which you will need to type in your username and password. Please note that the password will not show anything as a security feature.
Now, you should see the following window. As you can see, my server is running Ubuntu 10.04. You can see that it's named testing. If your server is not 10.04 LTS or newer (10.10 or 11.04), I highly recommend asking your host to upgrade.
Step 2: Updating and upgrading the base system.
Now, it's a good idea to update and upgrade our system to the latest version before we do anything. So, type in the following:
apt-get update
At the end, it should say:
Code:
Fetched 12.2MB in 7s (1708kB/s)
Reading package lists... Done
Code:
apt-get upgradeNow, I usually reboot at this stage as this is generally the last reboot I make for many months. This can be done by typing:
Code:
rebootStep 3: Installing everything.
I have a fork of a script created by VladGH, which installs everything you need to get running. My script also installs Varnish (a caching server), which is highly recommended if you are going to be hosting a large number of static sites, as well as Wordpress.
To get this to run, simply type:
Code:
sudo agt-get install git-core screen unzip
Code:
mkdir ~/setup-files
cd ~/setup-files
wget http://static.seotal.com/lemp.zip
unzip lemp.zip
sudo chmod 777 install.sh
sudo ./install.shAfter this has been completed, you will need to start getting your sites setup and working.
By default, this will work fine. You will might want to tweak nginx or Varnish, however I've been running off this setup for a while and it works fine.
So now if you access http://yourhostip you should be able to see the PHP info page - this tells you that:
1) NGINX was installed.
2) PHP was installed.
3) You can check for APC/Memcached/MySQL as well.
If all works fine, you can remove these files.
Code:
rm -rf /var/www/index.php
rm -rf /var/www/apc.phpNow let's say that you have 3 websites:
- example.com
- subdomain.example.com
- third.example.com
You can have as many domains/subdomains with NGINX, but I'll just be focusing on these three as an example. Change these to your domain(s) as you go.
Now you need to change directory to the nginx configuration folder, this can be done via:
Code:
cd /etc/nginx/sites-enabledA technique that I do is running Wordpress Multisite which allows me to run as many Wordpress sites that I need off one installation, as well keeping the code uniform across this site. A best practices guide for this is coming soon.
Let's just assume that we want a different Wordpress setup for each domain.
So let's remove the default file:
Code:
sudo rm -rf /etc/nginx/sites-enabled/defaultSo, let's use nano to create the configuration for example.com with Wordpress.
Code:
sudo nano /etc/nginx/sites-enabled/example
Code:
server
{
    server_name example.com;
    listen 801;
    server_tokens off;
    root /var/www/example;
    index index.php;
    access_log /var/log/nginx/example.access.log;
    error_log /var/log/nginx/example.error.log;

    # If you use feedburner, it's a good idea to rewrite.. however I don't use it.
    #if ($http_user_agent !~ FeedBurner) {
    #    rewrite ^/comment/feed/ http://feeds.feedburner.com/your-comment-feed last;
    #    rewrite ^/feed/ http://feeds.feedburner.com/your-feed last;
    #}

    # if the requested file exists, return it immediately
    if (-f $request_filename)
    {
        break;
    }

    if (!-e $request_filename)
    {
        rewrite . /index.php last;
    }
    if (!-e $request_filename)
    {
        rewrite ^.*$ /index.php last;
    }

    location /
    {
        try_files $uri $uri/ index.php;
        gzip  on;
        gzip_http_version 1.0;
        gzip_vary on;
        gzip_comp_level 3;
        gzip_proxied any;
        gzip_buffers 16 8k;
    }
    location ~ \.php$
    {
        try_files $uri $uri/ index.php;
        include /etc/nginx/fastcgi.conf;
        fastcgi_pass unix:/var/run/php5-fpm.sock;
    }

    location = /favicon.ico
    {
        log_not_found off;
        access_log off;
    }
    location ~ \..*/.*\.php$
    {
        return 403;
    }
    location ~* \.(js|css|png|jpg|jpeg|gif|ico)$
    {
        expires max;
        log_not_found off;
    }
    location ~ /\.ht
    {
        deny  all;
    }
    location ~ /\.git
    {
        deny  all;
    }
}Let's get it setup and running!
I usually run PHPMyAdmin on a different port than 80, or run it through a subdomain (such as phpmyadmin.example.com). For this example I'll be running it through port 82.
Code:
mkdir /var/www/phpmyadmin
cd /var/www/phpmyadmin
wget http://voxel.dl.sourceforge.net/project/phpmyadmin/phpMyAdmin/3.4.7/phpMyAdmin-3.4.7-all-languages.zip
mv phpMyAdmin-3.4.7-all-languages/* /var/www/phpmyadmin
rm -rf /var/www/phpmyadmin/phpMyAdmin-3.4.7-all-languages/
Code:
nano /etc/nginx/sites-enabled/phpmyadmin
Code:
server
{
    listen *:82;
    server_tokens off;
    root /var/www/phpmyadmin;
    index index.php;
    access_log /var/log/nginx/example.access.log;
    error_log /var/log/nginx/example.error.log;

    # if the requested file exists, return it immediately
    if (-f $request_filename)
    {
        break;
    }

    location /
    {
        try_files $uri $uri/ index.php;
        gzip  on;
        gzip_http_version 1.0;
        gzip_vary on;
        gzip_comp_level 3;
        gzip_proxied any;
        gzip_buffers 16 8k;
    }
    location ~ \.php$
    {
        try_files $uri $uri/ index.php;
        include /etc/nginx/fastcgi.conf;
        fastcgi_pass unix:/var/run/php5-fpm.sock;
    }

    location = /favicon.ico
    {
        log_not_found off;
        access_log off;
    }
    location ~ \..*/.*\.php$
    {
        return 403;
    }
    location ~* \.(js|css|png|jpg|jpeg|gif|ico)$
    {
        expires max;
        log_not_found off;
    }
    location ~ /\.ht
    {
        deny  all;
    }
    location ~ /\.git
    {
        deny  all;
    }
}
Code:
sudo /etc/init.d/nginx restart
sudo /etc/init.d/varnish restart
Now, click Databases, then choose the database name, then click create. Make sure you remember this database, as this will be the one we are going to use with your CMS.
Now, let's setup Wordpress under the folder:
Code:
sudo mkdir /var/www/example
cd /var/www/example
sudo wget http://wordpress.org/latest.zip
sudo unzip latest.zip
sudo mv wordpress/* /var/www/example
rm -rf wordpress
mv wp-config-sample.php wp-config.php
chmod 777 wp-config.php
nano wp-config.phpNow, we need to restart nginx and varnish, and install Wordpress.
Code:
sudo /etc/init.d/nginx restart
sudo /etc/init.d/varnish restart
Now, go through the Wordpress installation using your details from before.
Afterwards, it's a good practice to change wp-config.php permissions back:
Code:
chmod 655 wp-config.phpIf you have any additional questions, please feel free to leave a reply here or send me a PM and I'll help you out.


